Age Verification
This website contains age-restricted material including nudity and explicit content. By entering, you confirm being at least 18 years old or the age of majority in the jurisdiction you are accessing the website from.
Our parental controls page explains how you can easily block access to this site.
0
Discussions for Scenes for Version 1.2.X Fullscreen Mode here 论坛 / 关于iStripper的一切
EverthangForever
已加入 在 Oct 2009 2534 发布
December 3, 2017 (edited)
@Emu sure, I was using Gimp for quite a while earlier way back before @WA mentioned Paint.net
and I found the transition to Paint.net really slick, intuitive and easy to follow. Very moreish process. It was also not making my machine at the time (an old XP) hang like Gimp did. The last straw for me was trying to compile animated gifs with Gimp. After a lot of effort, the thing failed and Gimp's explanation was that animation was experimental beta only.
Through friends here, I was able to find a number of Paint.dot community made filters like the black or white to transparent and several other filters which have allowed me to enhance the range of official Effects & Filters available in my current Paint.net. These and the more recent official upgrades include basic perspective adjustment, color and opacity tweeking, even compatibilities with some PSP tubes and so on. I did actually buy PSP beginning of this year, but did not pursue it because Corel spam me so darn much my email looks like wall paper. This has recently extended to them inserting without solicitation, a nag buy-me buy-me pop-up on my screen while I am doing something else. I don't really need that or to use PSP or graphics professionally so suits me fine stay as I am.
I have to remark how amazingly precise your cutouts of garden plants can be. I don't know how you achieve such precision. Maybe the background is chroma-keyed when you photograph them👌
and I found the transition to Paint.net really slick, intuitive and easy to follow. Very moreish process. It was also not making my machine at the time (an old XP) hang like Gimp did. The last straw for me was trying to compile animated gifs with Gimp. After a lot of effort, the thing failed and Gimp's explanation was that animation was experimental beta only.
Through friends here, I was able to find a number of Paint.dot community made filters like the black or white to transparent and several other filters which have allowed me to enhance the range of official Effects & Filters available in my current Paint.net. These and the more recent official upgrades include basic perspective adjustment, color and opacity tweeking, even compatibilities with some PSP tubes and so on. I did actually buy PSP beginning of this year, but did not pursue it because Corel spam me so darn much my email looks like wall paper. This has recently extended to them inserting without solicitation, a nag buy-me buy-me pop-up on my screen while I am doing something else. I don't really need that or to use PSP or graphics professionally so suits me fine stay as I am.
I have to remark how amazingly precise your cutouts of garden plants can be. I don't know how you achieve such precision. Maybe the background is chroma-keyed when you photograph them
TheEmu
已加入 在 Jul 2012 3309 发布
December 3, 2017 (edited)
@Everthang - Paint.net upgraded itself (after asking permission) today - but I do not see any perspective correction functionality, nor does the color curve adjustment allow me to adjust opacity this way - two features which I use a lot. But I do have to admit it is a lot user friendlier that Gimp. (Just as Gimp 2 was a lot friendlier than Gimp 1 which I gave up on)
Sexybrune
已加入 在 Aug 2010 53 发布
December 3, 2017
Thank you all for your good advice and info
EverthangForever
已加入 在 Oct 2009 2534 发布
December 3, 2017 (edited)
@SB can I ask you for a favor ? To make .png something in 1920 x 1080 for the community ?
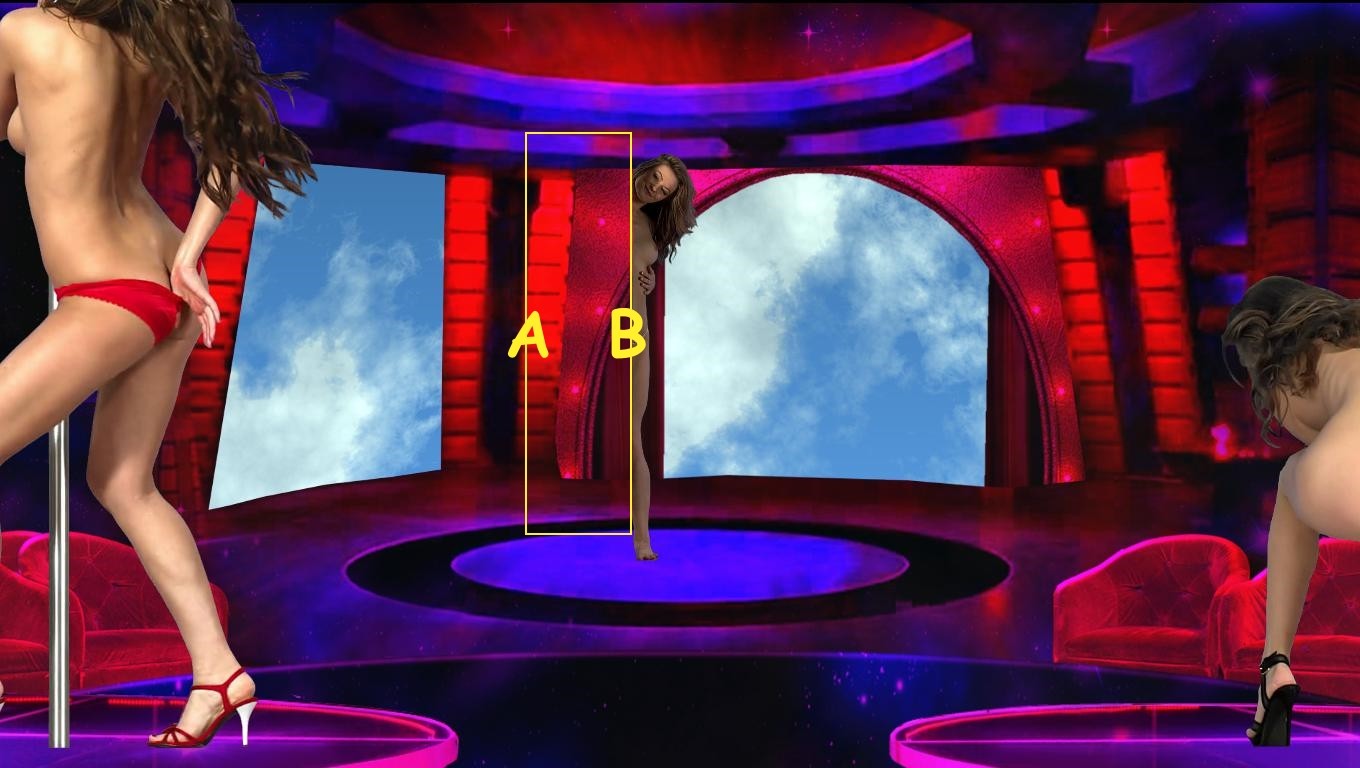
You can see in your .scn above how some of the models appear from a curtain showing half
the body. Many many fullscreen community members like me want to be able to watch these 'inout' clips in a fullscreen scene like yours.
Instead of worrying about changing SB1btrans.png (the floating stages)
we need you to make more adjustment to your center stage background SB2.png.
Maybe you can adjust SB2.png to show many vertical curtains together in the area shown A - B. somehow you can make in a way that looks good.
A - B is the place where the model makes her 'inout' performance. Many half transparent curtains we can place in layers on the .scn to accomodate this, if you make a good new edit of this background with for example ~ much tall vertical curtains between the sky windows. ;-) It can be this background or any other background you choose, however the curtain must be in this area A- B
I hope it is possible.
Pourrais-je te demander un service ? Faire quelque chose .png en 1920 x 1080 pour la communauté?
Vous pouvez voir dans votre .scn ci-dessus comment certains des modèles apparaissent à partir d'un rideau montrant la moitié
le corps. Beaucoup de membres de la communauté en plein écran comme moi veulent être en mesure de regarder ces clips «inout» dans une scène en plein écran comme le vôtre.
Au lieu de se soucier de changer SB1btrans.png (les étapes flottantes)
nous avons besoin de vous pour faire plus d'ajustement à votre fond de scène de centre SB2.png.
Peut-être que vous pouvez ajuster SB2.png pour montrer plusieurs rideaux verticaux ensemble dans la zone A-B. D'une certaine manière vous pouvez faire d'une manière qui a l'air bien.
A - B est l'endroit où le modèle fait sa performance 'inout'. Beaucoup de rideaux semi-transparents que nous pouvons placer en calques sur le .scn pour accommoder ceci si vous faites un bon nouveau montage de ce fond avec par exemple ~ de grands rideaux verticaux entre les fenêtres du ciel. ;-)
Il peut s'agir de cet arrière-plan ou de tout autre arrière-plan que vous choisissez mais le rideau doit être dans cette zone. A- B
J'espère que c'est possible.
Sexybrune
已加入 在 Aug 2010 53 发布
December 4, 2017 (edited)


ah yes OK
I'm looking to do that
bounty scene en jpg doit être changée en png
bounty scene in jpg must be changed to png
je crois que ce ñ'est pas encore concluant il faut que je cherche encore
I think it's not yet conclusive
I have to search again
I'm looking to do that
bounty scene en jpg doit être changée en png
bounty scene in jpg must be changed to png
je crois que ce ñ'est pas encore concluant il faut que je cherche encore
I think it's not yet conclusive
I have to search again
EverthangForever
已加入 在 Oct 2009 2534 发布
December 4, 2017 (edited)
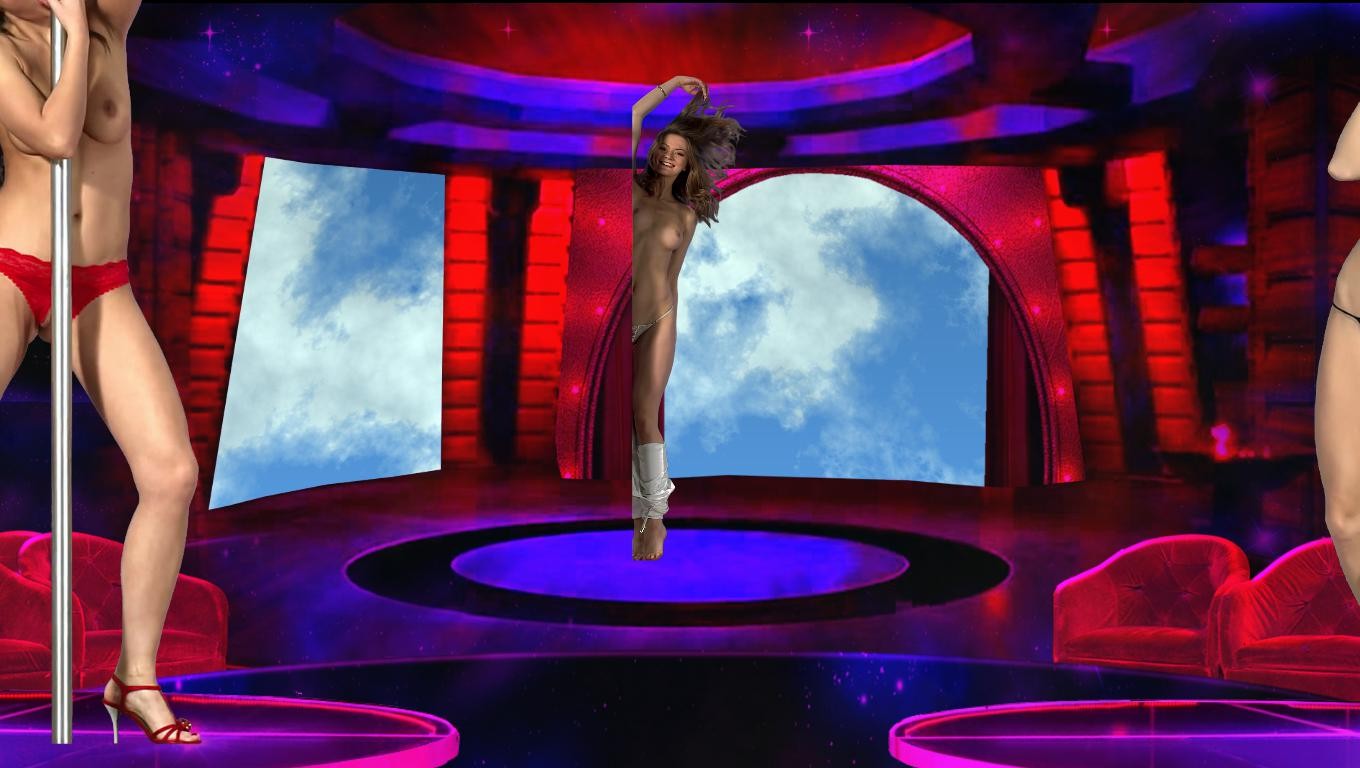
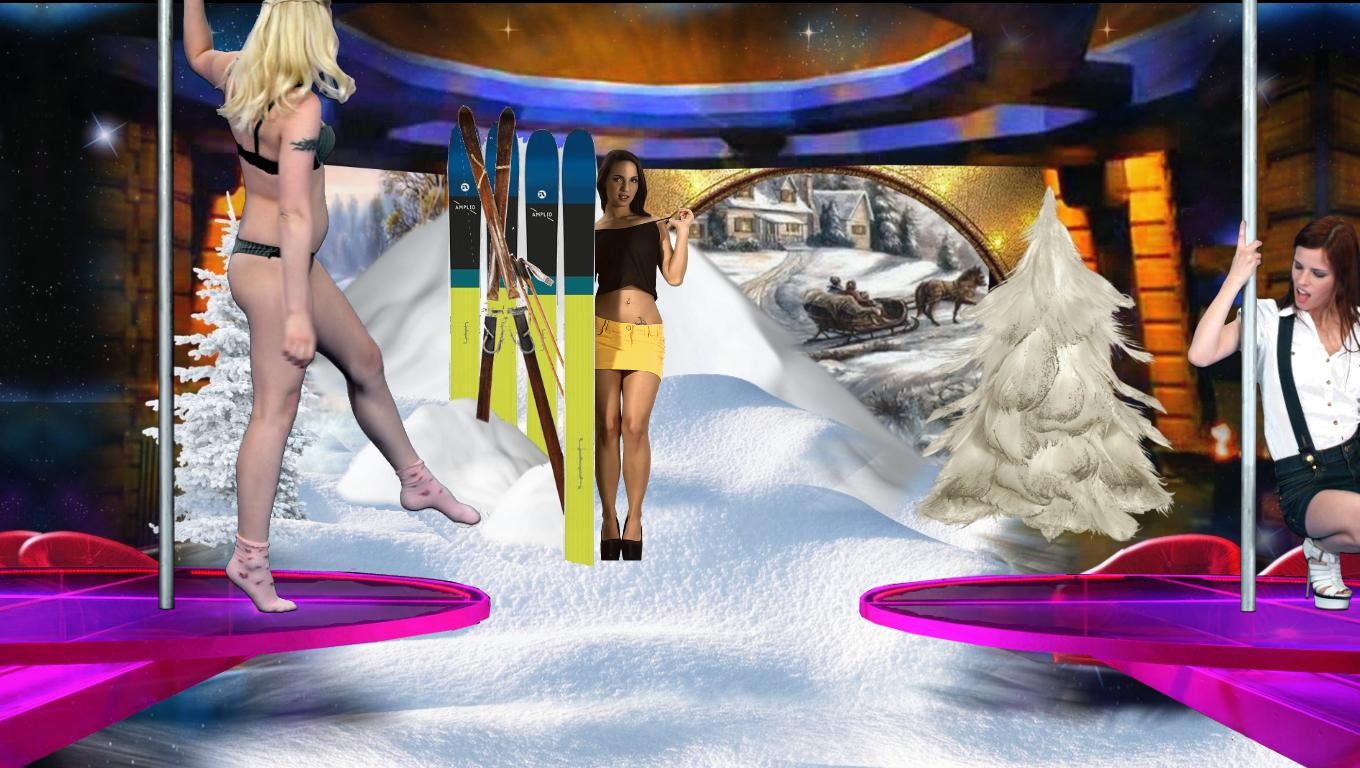
@SB bravo for experimentation more.
The second picture is good if there was for example: a vertical group of snow skis
where the snowball is located.
Maybe something .png at A-B for the model to obscure behind with a vertical edge ;-)
La deuxième image est bonne s'il y avait par exemple
un groupe vertical de skis de neige où se trouve la boule de neige
Peut-être que quelque chose .png pour le modèle d'obscurcir derrière avec un bord vertical
Bravo pour l'expérimentation de plus.
Sexybrune
已加入 在 Aug 2010 53 发布
December 5, 2017 (edited)

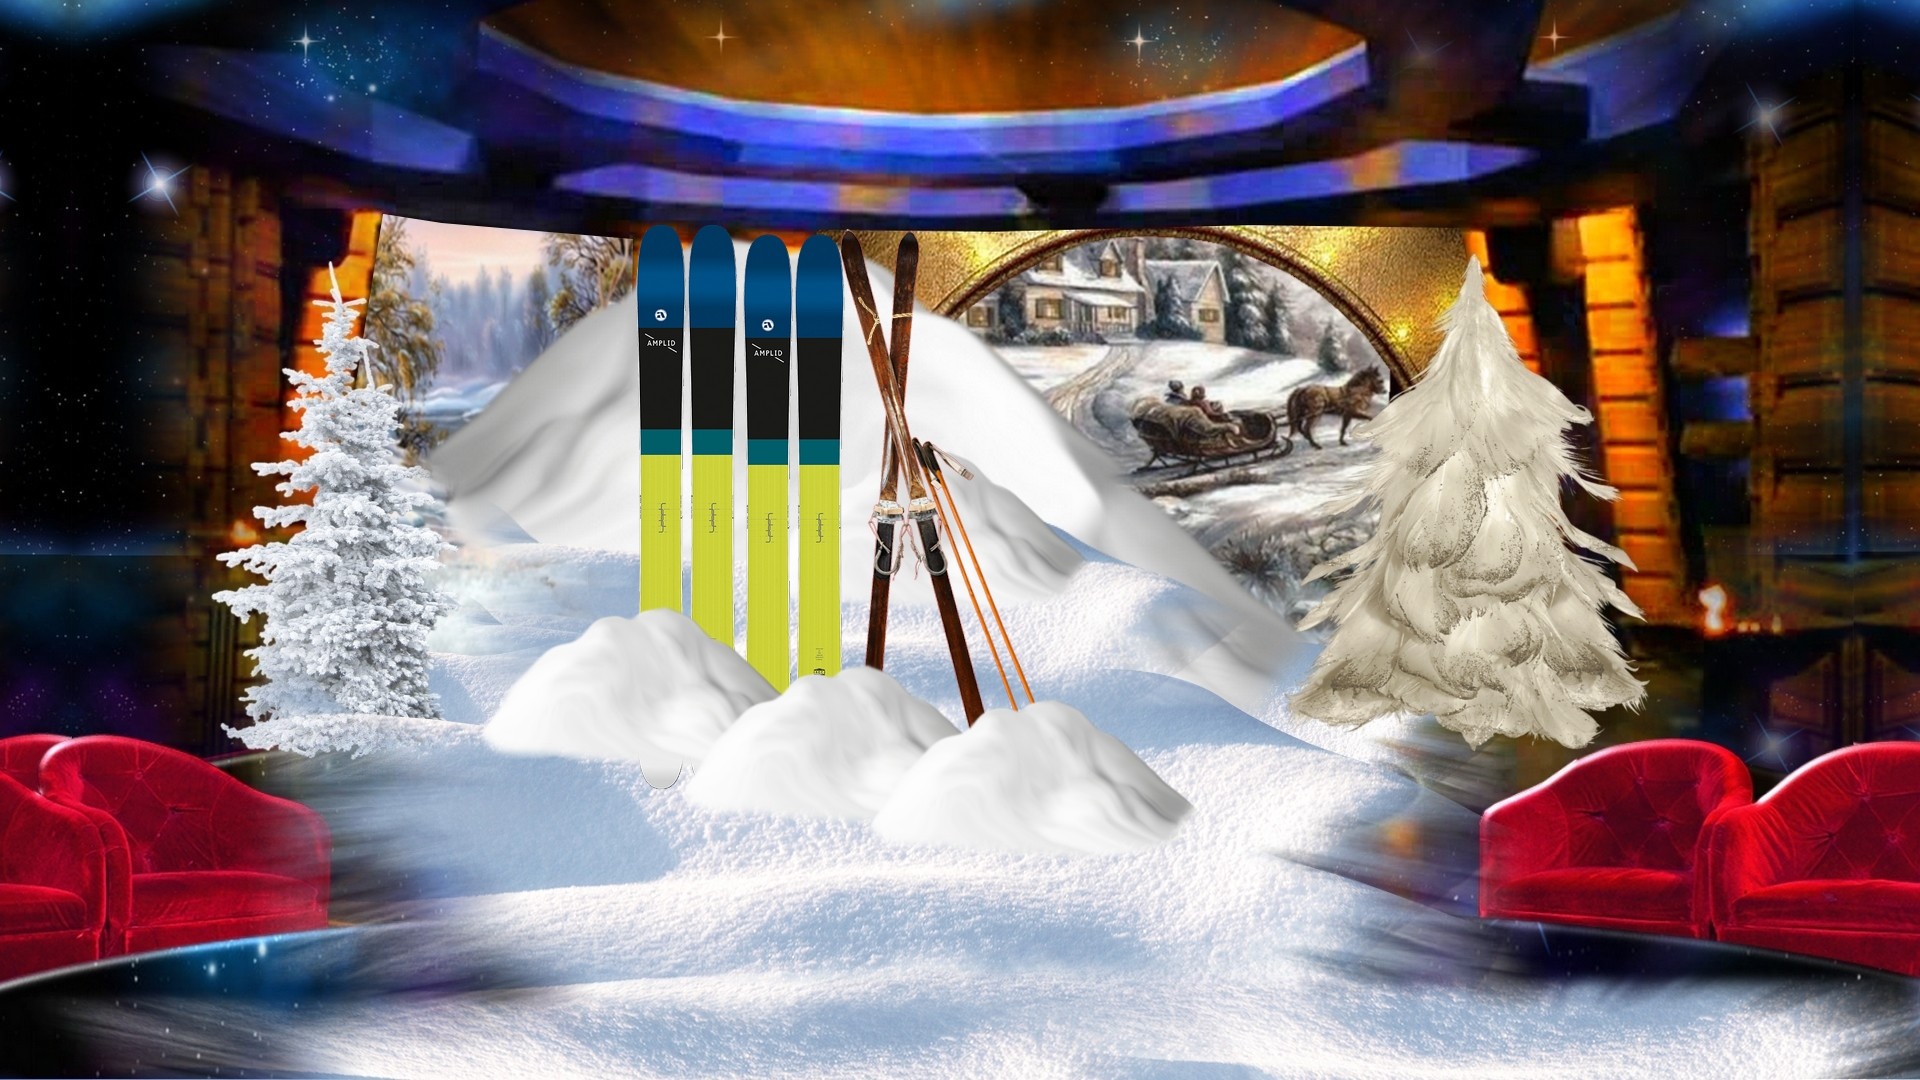
like thjs?
comme cela ?
comme cela ?
EverthangForever
已加入 在 Oct 2009 2534 发布
December 5, 2017
@SB thank you very much
Yes..it works for the new 'inout' clips
not so much for the older ones, which was before Totem lifted their game
and placed their blue inout screen more consistantly.
For the recent inout clips however, it is a huge success. Kudos for da help
good job @SB, Merci beaucoup. I will upload the overlay soon :-)
Oui..it fonctionne pour les nouveaux clips 'inout'
pas tellement pour les plus âgés qui était avant que Totem a soulevé leur jeu
et placé leur écran inout bleu plus régulièrement.
Pour les récents clips inout cependant c'est un énorme succès. Bravo pour son aide
bon travail @SB Merci beaucoup. Je vais upload la superposition bientôt
Sexybrune
已加入 在 Aug 2010 53 发布
December 5, 2017
good
I'm happy that it works because I had not tested
bien
je suis heureuse que cela fonctionne car je n'avais pas testé
I'm happy that it works because I had not tested
bien
je suis heureuse que cela fonctionne car je n'avais pas testé
EverthangForever
已加入 在 Oct 2009 2534 发布
December 5, 2017
All done ..and posted on Share thread..Merci @Sexybrune
http://www.istripper.com/forum/thread/29408/20?post=561640
关于iStripper的一切 / Share your FullScreen - Member Created Scenes here
@Sexybrune Scene Mixes : includes FS discussion's SBModET01 plus alternately two more .scn's ~ Next list favorite model for Left floating stage then ~ right floating stage. SBModET04 is a new snow sce...
Sexybrune
已加入 在 Aug 2010 53 发布
December 5, 2017
thank you EverthangForever
DANO70
已加入 在 Feb 2008 742 发布
December 8, 2017
@ALL...thanks for all your latest works. @Emu the new fairgrounds is epic sir.😵
EverthangForever
已加入 在 Oct 2009 2534 发布
December 9, 2017 (edited)
http://www.istripper.com/forum/thread/29408/20?post=562204
关于iStripper的一切 / Share your FullScreen - Member Created Scenes here
And the final new set of scenes for today are set in a fairground. Everything moves, the dodgems bounce off each other in one pair of scenes or just proceed carefully around the rink in another pair....
@Z22 ..in camera node... clipplaneI'm still curious about clipplane as a parameter of Camera node.?
Is it only for 2D Camera ( presumably preventing it from partially working with a tilted reflection clip ) ?
Can you explain it's settings range, syntax and effects pls ?
TheEmu
已加入 在 Jul 2012 3309 发布
December 9, 2017
The rear clip plane, which is what is controlled by the clipplane parameter, is a plane perpendicular to the line of sight of the camera beyond which anything in the scene is discarded. There are 5 other clip planes - the front clipplane which for iStripper seems to be located at the camera itself, and the upper and lower clip planes which correspond to the upper and lower and left and right limits to the camera's field of view. The positions of these last four clip planes are therefore controlled by the camera's Angle parameter.
There is no angle parameter for a 2D camera (if you specify one it has no effect) and use of a rear clipplane would make little sense for a 2D camera because, in effect, with a 2D camera the Z dimension is ignored (alternatively you can think of a 2D camera as being a camera at an infinite distance from the scene it is viewing so everything would be beyond it).
For a 3D camera the clip planes define a pyramidal region of 3D space enclosing the scene (its a truncated pyramid if the front clip plane is not at the camera position). anything outside of this 3D region is simply ignored.
TheEmu
已加入 在 Jul 2012 3309 发布
December 9, 2017 (edited)
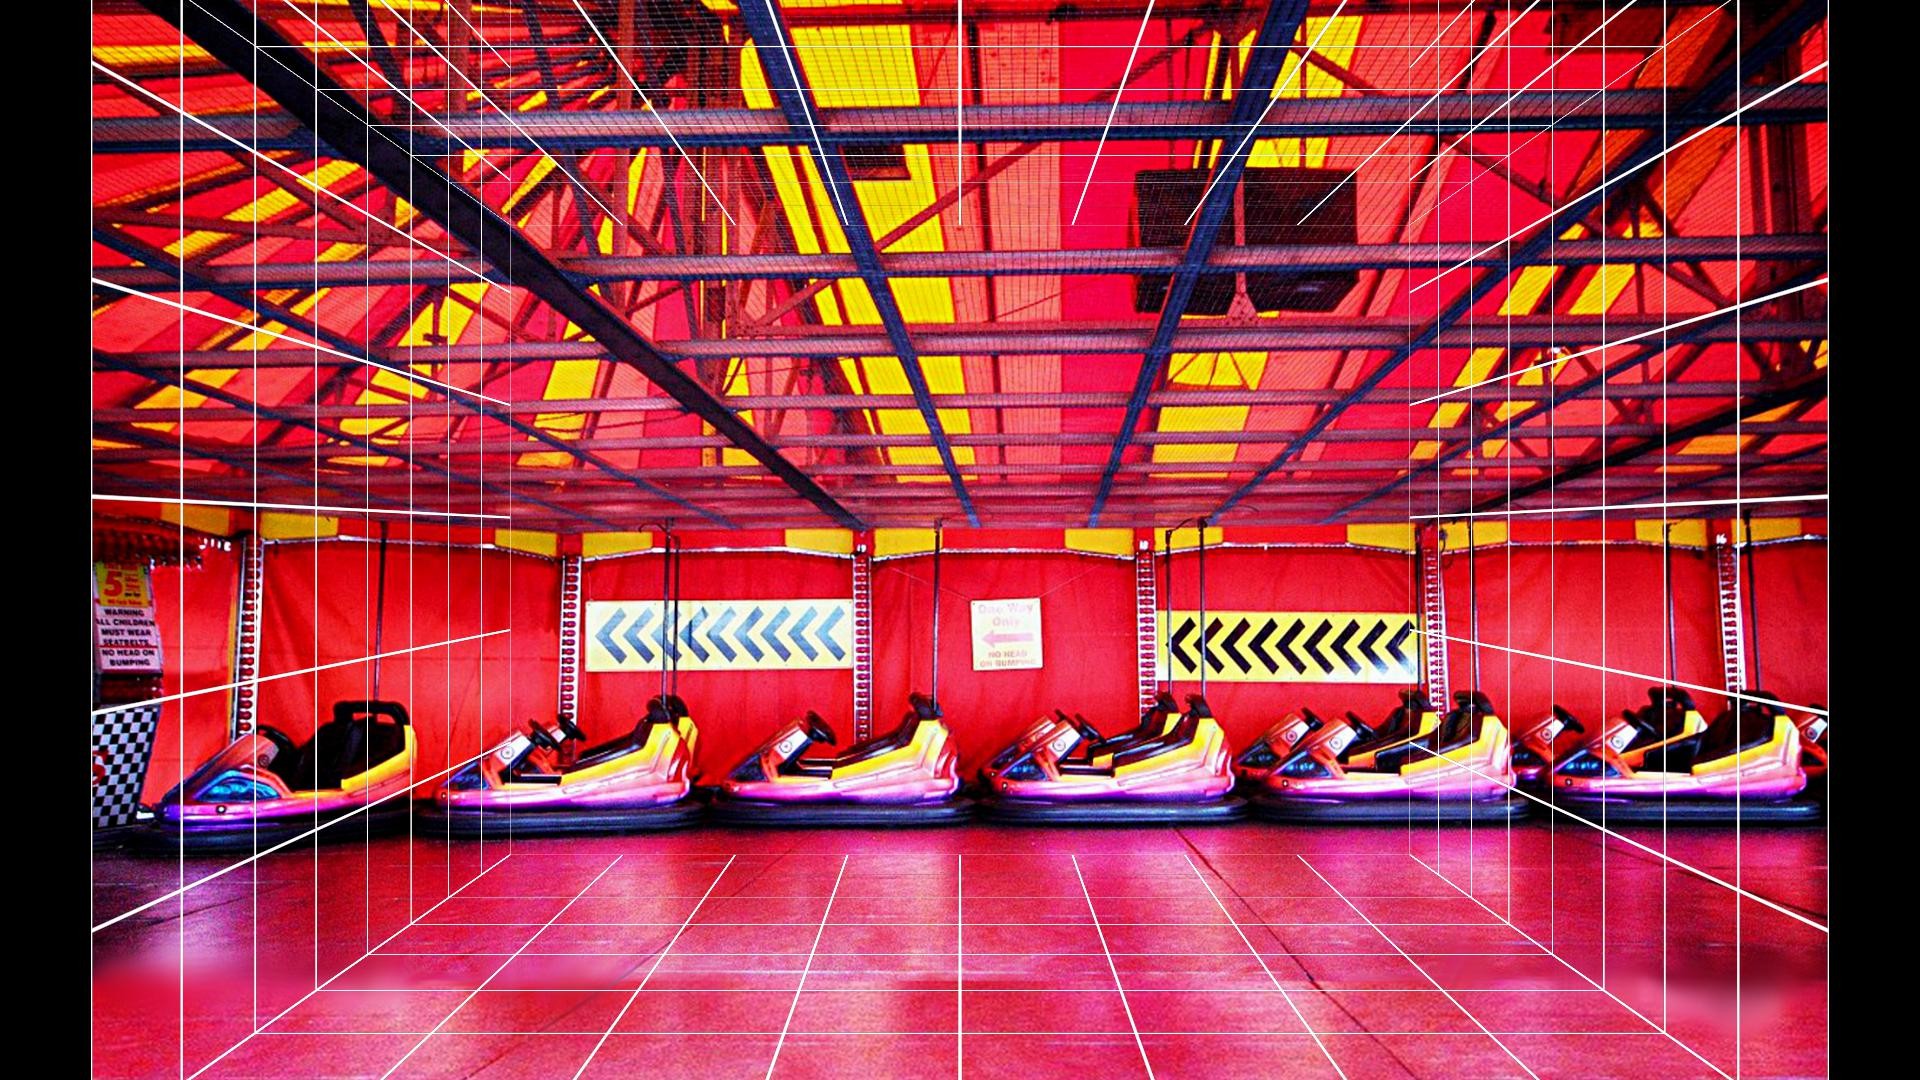
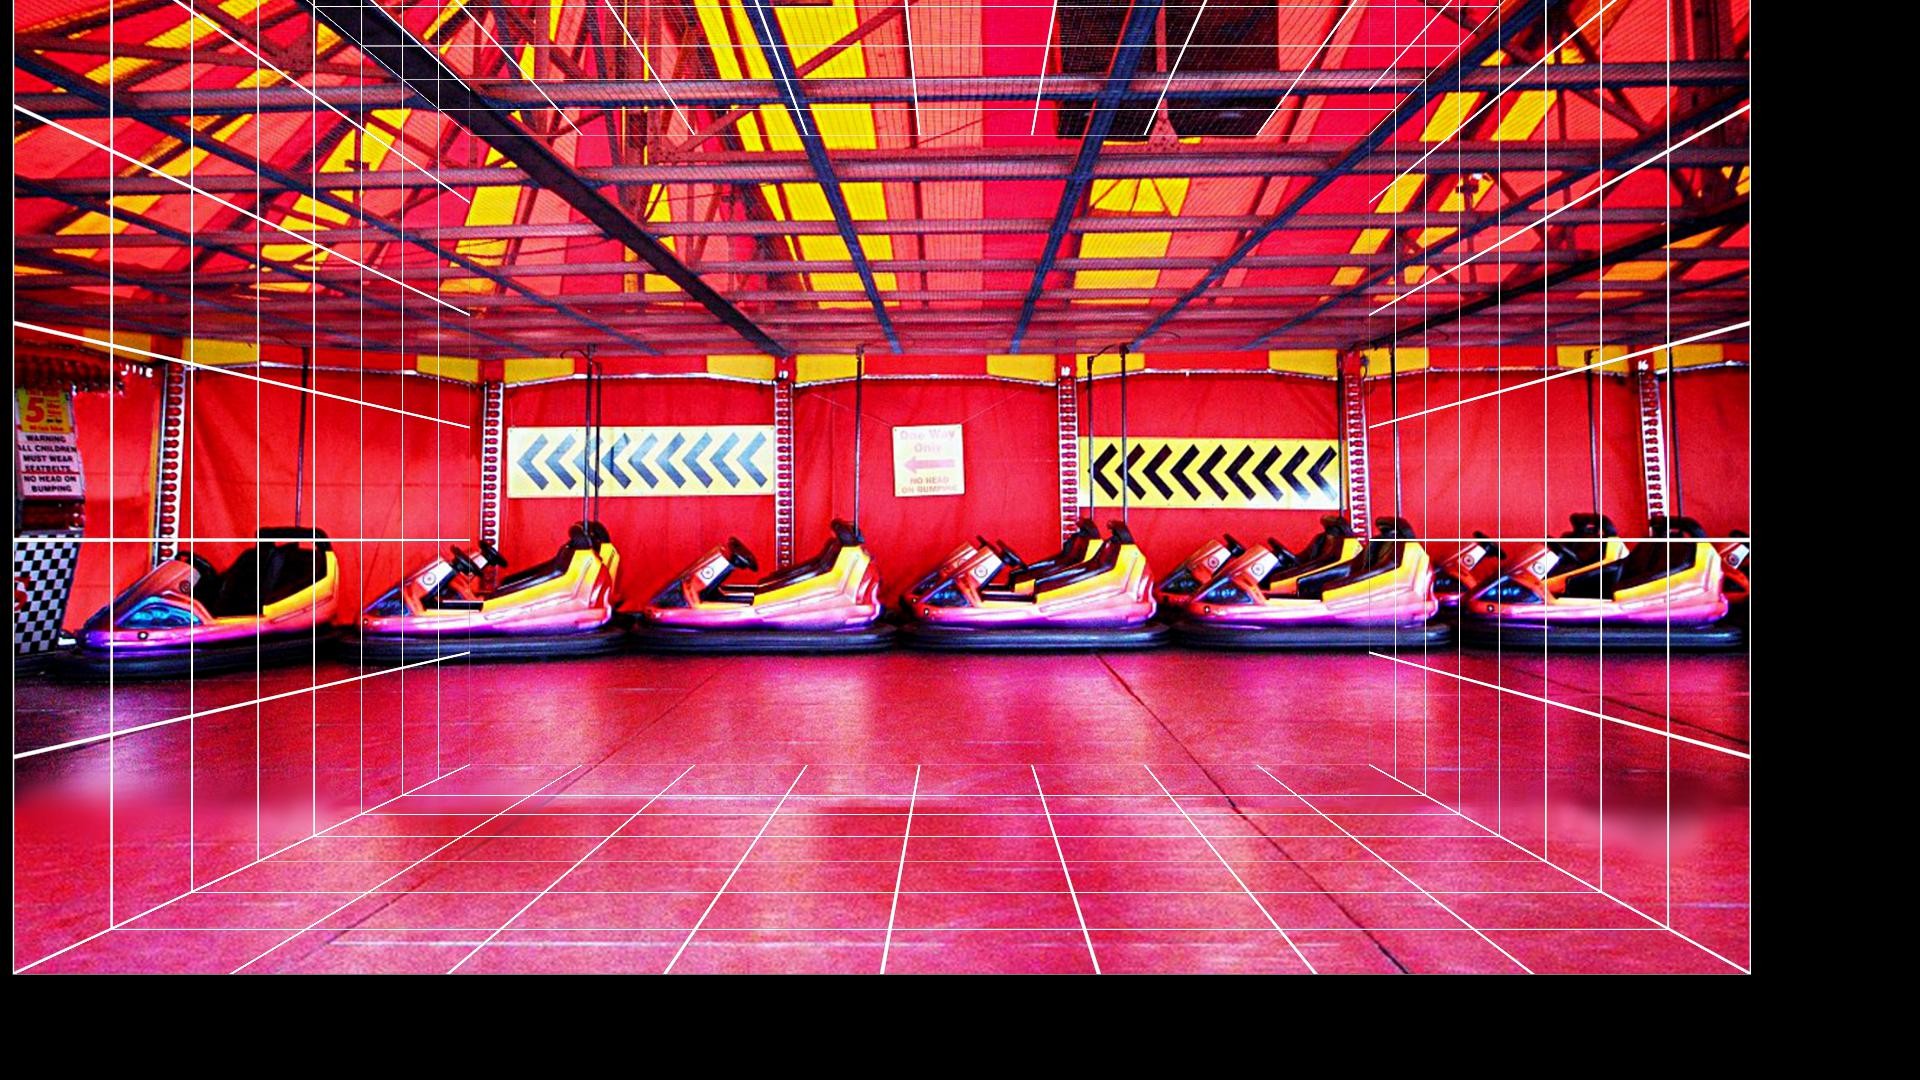
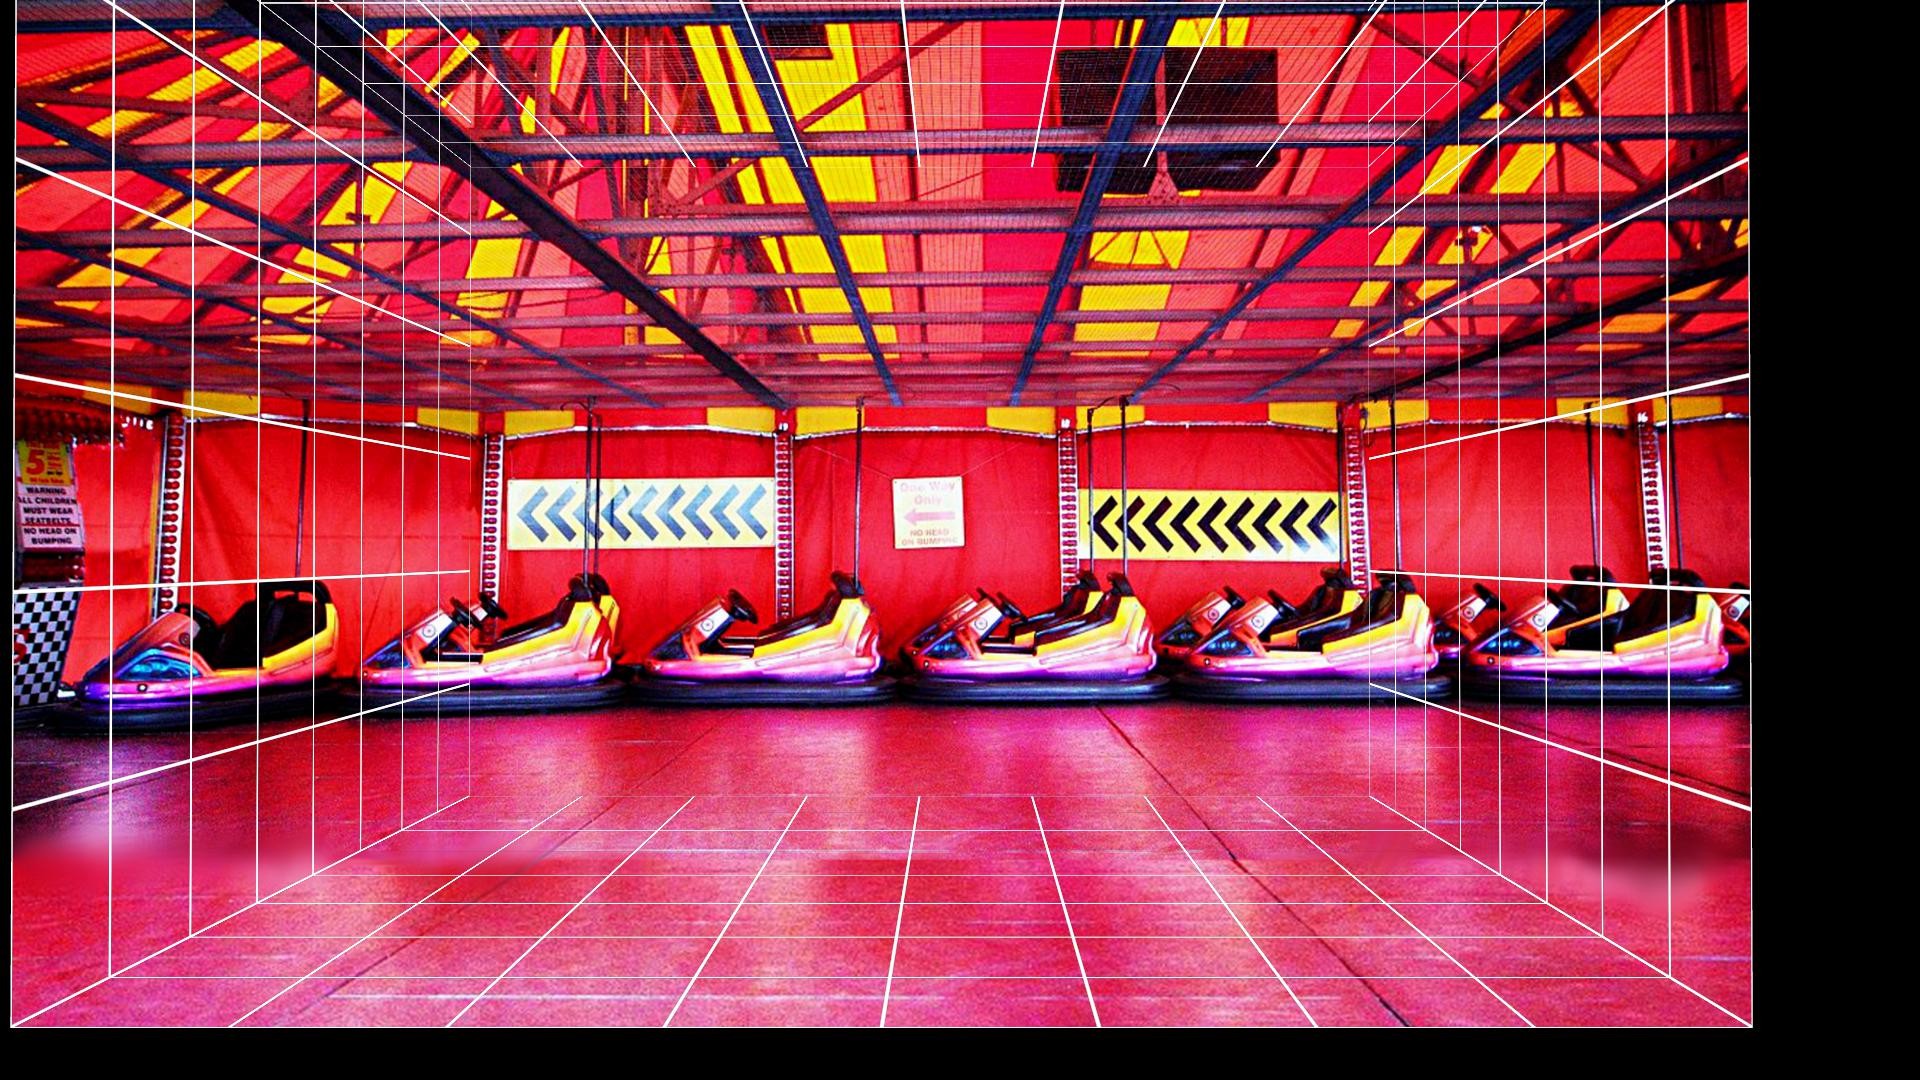
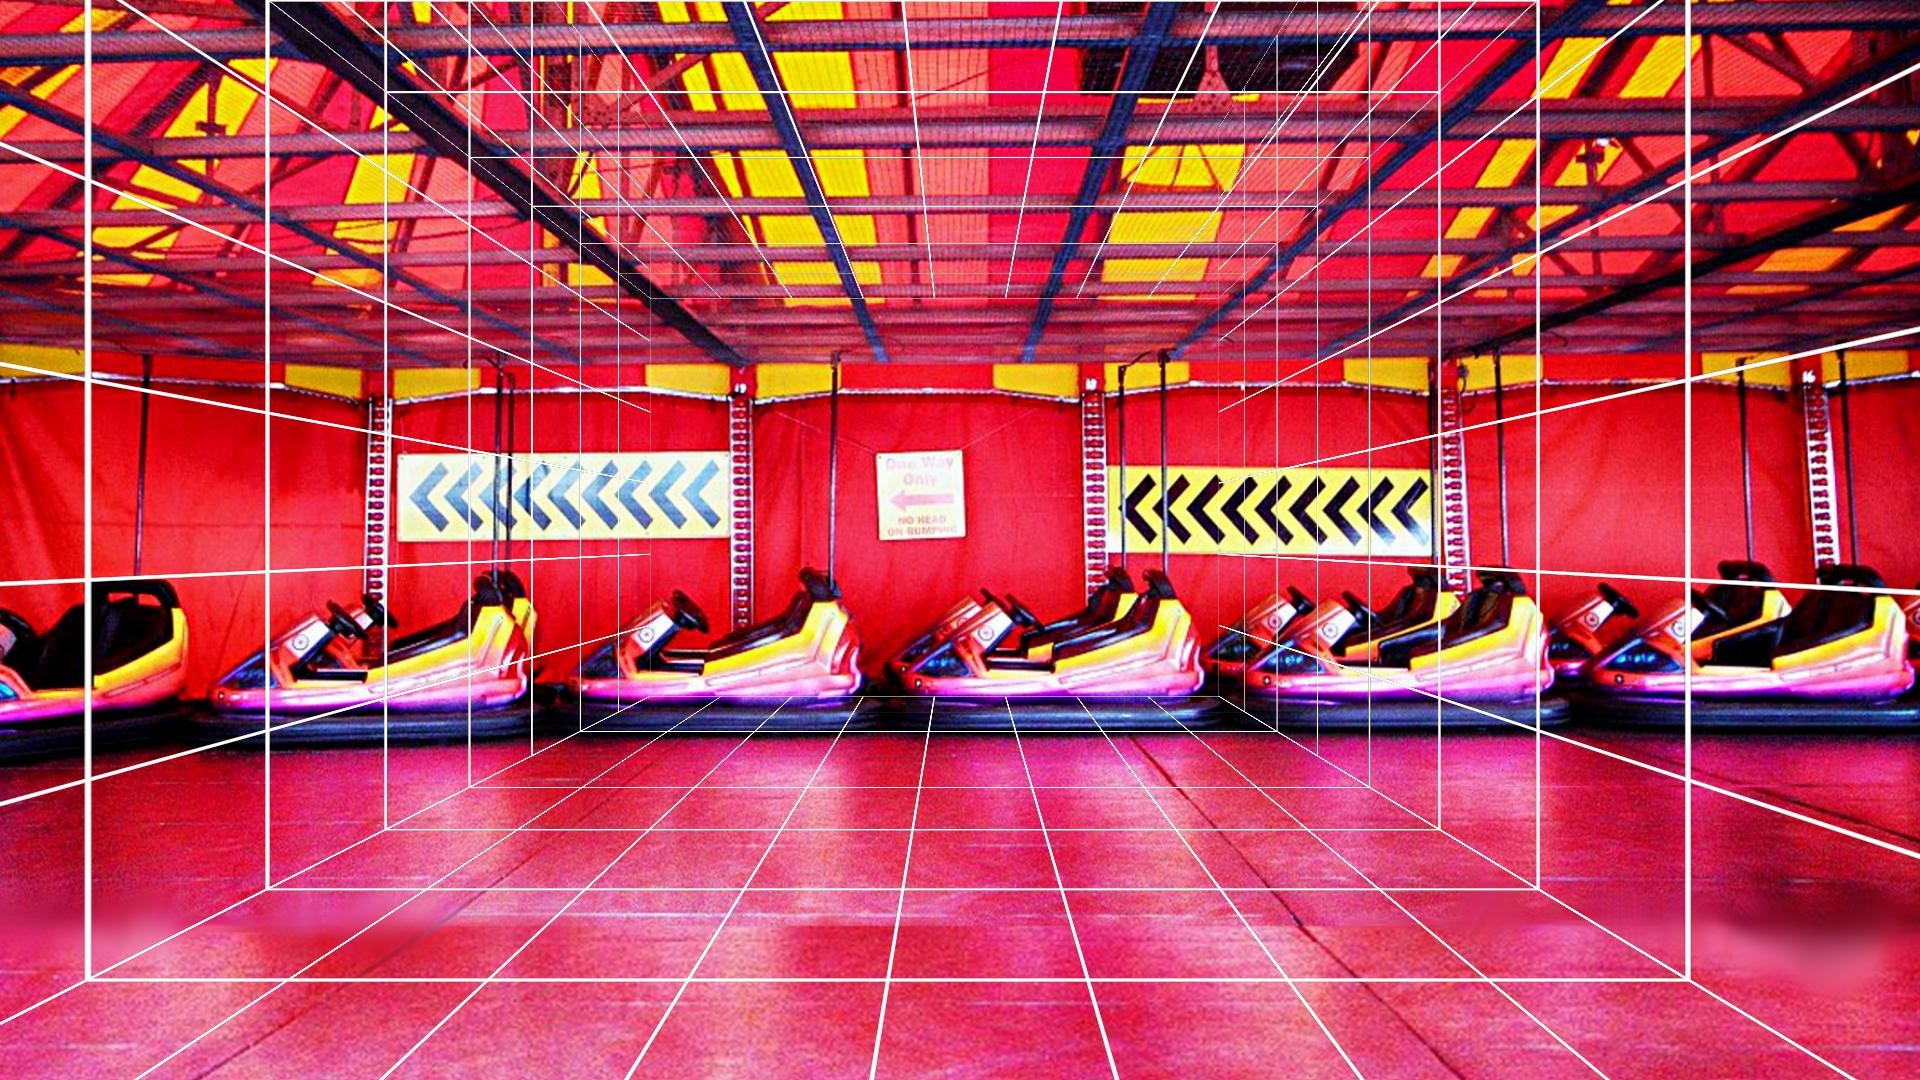
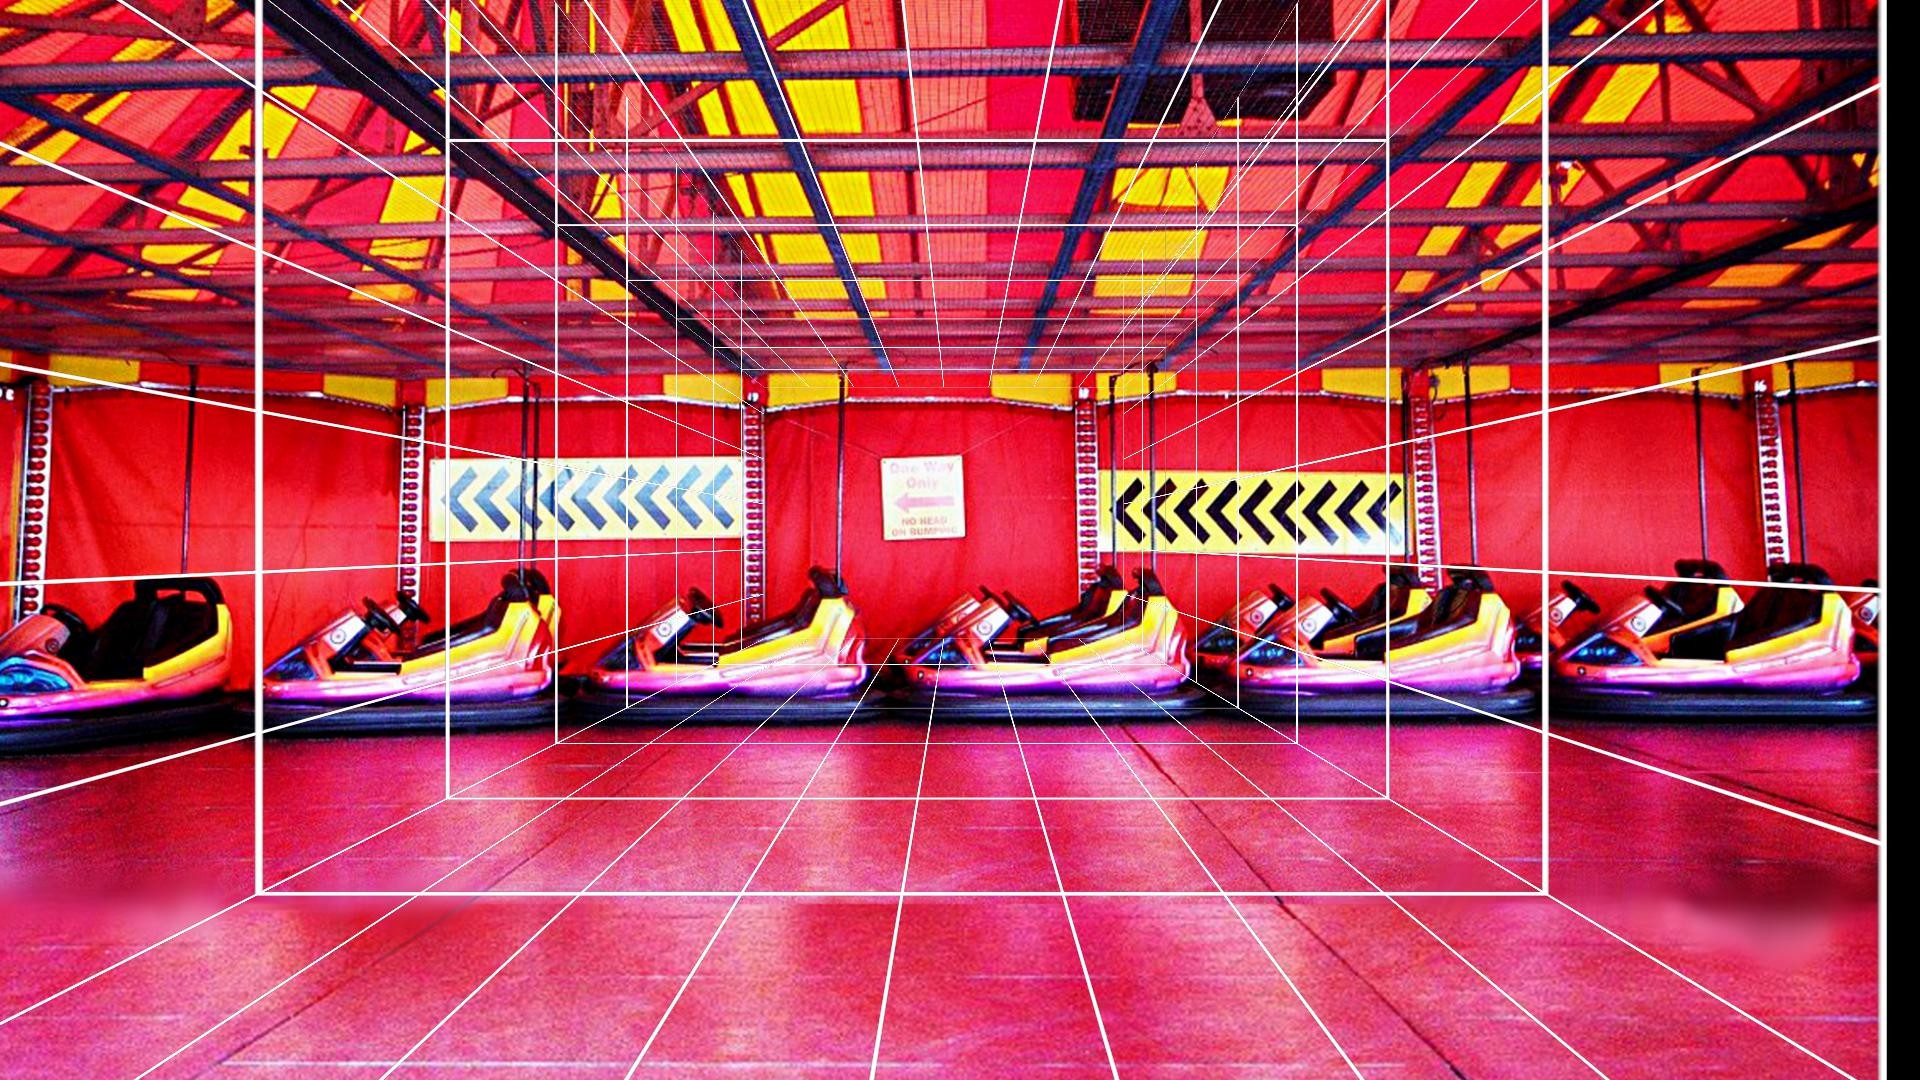
For one of my recently uploaded Fairground scenes I was having difficulty finding a position for the camera which did not cause obvious problems with perpective as the various parts of the sceen were moved about. As the image I was using for the background had nicely defined horizontal planes at floor and ceiling level with a strong rectangular grid pattern on the ceiling and with a rather weaker one on the floor I decided to add a gridwork box of my own and tweak the camera position, camera target and camera angle until the grids in the original scene coincided. I thought some of you might find the technique useful so I have made this post showing what I did.
The attached screen shots show a few stages in the process. They correspond to the following sequence of parameter values:-
In practice I used rather more intemediate steps as I iterrated towards the final set of values. I was surprised just how close the camera had to be and how wide an angle was required to match the perspective of the original photograph - though on looking at the image afterwards that should not have been a surprise even though they are a long way from the normal range of values that I tend to use. As you will see from the images the two sets of grids were made to correpond more closely at each stage until I was satified that they were close enough.
Once the perpective match had been acheived it was possible to use a single Y co-ordinate value for anything placed on the floor and to simply move things away from or towards the camera by only adjusting the Z co-ordinate of its position rather than having to adjust Y and height.
To generate the grid I used a simple shader to generate a grid in a frame buffer and positioned 4 copies of this grid to form the floor, ceiling and sides of my gridded box. You can use the same technique without a shader by creating a seperate grid image and use that as a texture but i find the shader based version more convenient. The shader is present in the Fairgrounds zip file and the scene file still contains the way it was used as comments.
Although the technique was sugested by the nicely aligned grid patterns in the image I was using it can be used with images in which the grids are rotated (you just rotate the gridded box to match) or even for settings without such grids in which case you just have to imagine them.
The attached screen shots show a few stages in the process. They correspond to the following sequence of parameter values:-
type : 3D
// starting point - capture 1
// angle : 45
// pos : 0, -700, 1500
// target : 0, -700, 0
// capture 2
// angle : 45
// pos : 90, -500, 1500
// target : 90, -500, 0
// capture 3
// angle : 45
// pos : 90, -550, 1500
// target : 90, -550, 0
// capture 3
// angle : 45
// pos : 90, -550, 1500
// target : 90, -550, 0
// capture 4
// angle : 90
// pos : 90, -550, 500
// target : 90, -550, 0
// capture 5
// angle : 121
// pos : 90, -550, 300
// target : 90, -550, 0
In practice I used rather more intemediate steps as I iterrated towards the final set of values. I was surprised just how close the camera had to be and how wide an angle was required to match the perspective of the original photograph - though on looking at the image afterwards that should not have been a surprise even though they are a long way from the normal range of values that I tend to use. As you will see from the images the two sets of grids were made to correpond more closely at each stage until I was satified that they were close enough.
Once the perpective match had been acheived it was possible to use a single Y co-ordinate value for anything placed on the floor and to simply move things away from or towards the camera by only adjusting the Z co-ordinate of its position rather than having to adjust Y and height.
To generate the grid I used a simple shader to generate a grid in a frame buffer and positioned 4 copies of this grid to form the floor, ceiling and sides of my gridded box. You can use the same technique without a shader by creating a seperate grid image and use that as a texture but i find the shader based version more convenient. The shader is present in the Fairgrounds zip file and the scene file still contains the way it was used as comments.
Although the technique was sugested by the nicely aligned grid patterns in the image I was using it can be used with images in which the grids are rotated (you just rotate the gridded box to match) or even for settings without such grids in which case you just have to imagine them.
EverthangForever
已加入 在 Oct 2009 2534 发布
December 11, 2017 (edited)
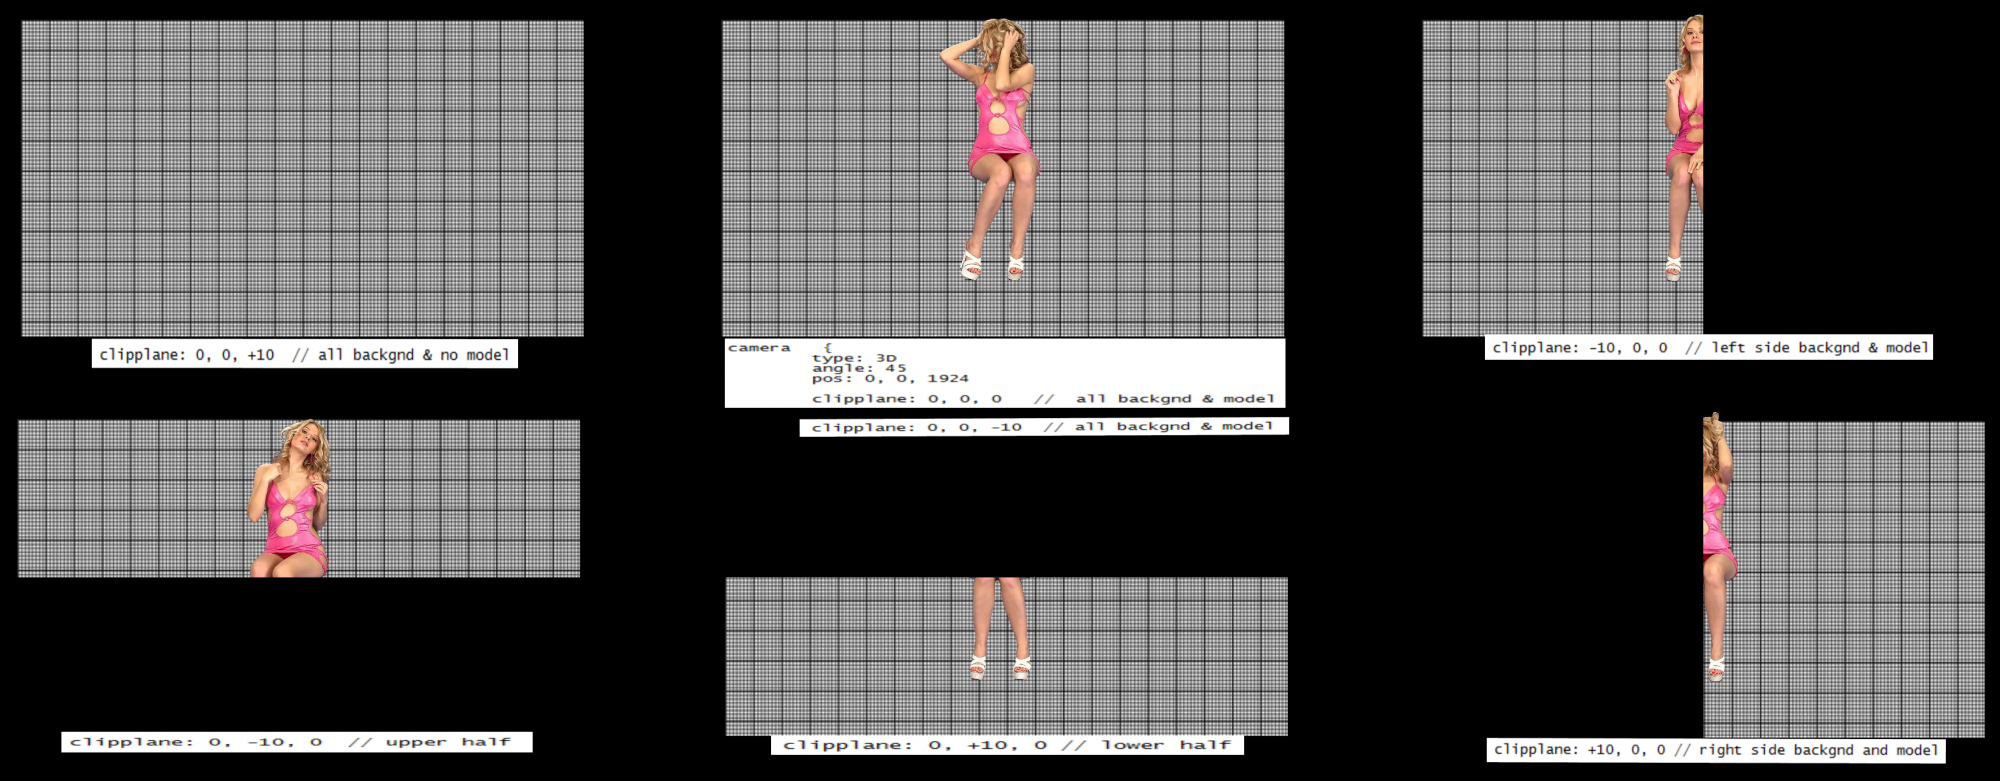
@TheEmu, I had no joy exploring settings for Camera node's clipplane parameters either regarding them as x, y, z pixels or as an angles format. The only settings which centred the model against a full background was 0, 0, and with 'z' = a negative value or zero.
As pixel measurements, the first setting 'x' value limited the clipsprite quad 'x' axis range from the model's quad center pont. The second setting 'y' resulted in all negative values displaying upper half of model, and any positive value displaying lower half of model. The third setting 'z' ?? value had no effect for any negative value however eliminated the model but not the background for any positive value.
camera {
type: 3D
angle: 45
pos: 0, 0, 1924
clipplane: 0, 0, 0 // all backgnd & model
( used +/-10 as arbitrary value here, as no noticeable effect with changed values)
clipplane: 0, 0, -10 // all backgnd & model
clipplane: 0, 0, +10 // all backgnd & no model
clipplane: -10, 0, 0 // left side backgnd & model
clipplane: +10, 0, 0 // right side backgnd and model
clipplane: 0, +10, 0 // lower half
clipplane: 0, -10, 0 // upper half
TheEmu
已加入 在 Jul 2012 3309 发布
December 11, 2017 (edited)
@EverthangForever - I have not tried to use clipplane: for anything but i had assumed that it define the position of a simple vertical plane beyond which everything was ignored. But it looks as if its a bit more complex.
From your experiments, assuming that the background and model are positioned at (0,0,0), it looks to me as if the first two values define a position in 3D space with the clipplane passing through that point and perpendicular to the camera direction. I can't explain why the background isn't affected by the 0,0,10 and 0,0,-10 settings, but this interpretation does explain why ofsetting by a small amount in X or Y chops out hlf the scene - it creates a clipplane that is almost parallel to the plane of the background and model but which intersects that plane along a vertical or horizontal line that almost, but not quite, passes through the centre of the scene. in this case roughly half of the clipplane will be in front of the background and model plane and the other half behind it. Where it is in front of the background and model they will be clipped, where it is behind them they will not be clipped and hence that half can be seen.
I expect that clipplane: 10,10,0 would cause the clipplane to intersect the scene's plane at 45 degrees.
I expect that clipplane: 400, 0, 0 would move the intersection line so that it was noticably offset from the origin.
Try putting a series of models at different Z values (and different X,Y values so that you can know which is which) and try clipplane: 0, 0, Z where Z (or is it -Z) is a value that is between two of the models. For such an experiment I suggest using Pole clips so that you have a well defined easily identifiable point for each clip or you can colour code them.
EverthangForever
已加入 在 Oct 2009 2534 发布
December 11, 2017 (edited)
@TheEmu, thanks v much. I will persue further combinations. FYI,..
The backgnd & clipsprite settings I used for the tests & shown above were:
and yes, if Iplace the model at 0, 0, 0
positive 'z' no longer makes the model disappear.
The backgnd & clipsprite settings I used for the tests & shown above were:
sprite {and
pos: 0, 0, 0
hotspot: 0.5, 0.5
source: Grid
opacity: 1.00
size: 1920, 1080
}
clipSprite {
pos: 0, 0, -660
source: clip
angle: 0, 0, 0
sittingheight: 666
}
and yes, if Iplace the model at 0, 0, 0
positive 'z' no longer makes the model disappear.
TheEmu
已加入 在 Jul 2012 3309 发布
December 11, 2017 (edited)
@EverthangForever - OK, that explains why there is a different effect on the background and the clip. But my interpretation of the third parameter of clipsprite cant be quite right. One possibility is that the three parameters just specify a direction and a fourth specifies how far along that direction the clipplane is located.
Edit: I have just seen some online Qt documentation that suggests that the four component interpretation is likely as the documentation describes a direction and a distance. If I am right it could be
clipplane : dist, x, y, z
or
clipplane: x, y,z, dist
Edit: I have just seen some online Qt documentation that suggests that the four component interpretation is likely as the documentation describes a direction and a distance. If I am right it could be
clipplane : dist, x, y, z
or
clipplane: x, y,z, dist
EverthangForever
已加入 在 Oct 2009 2534 发布
December 11, 2017 (edited)
@TheEmu, hmm, that could be why
applying an animation clause to the first setting
did not transition across left to right :-).
camera {
type: 3D
angle: 45
pos: 0, 0, 1924
clipplane: -10, 0, 0
animate: 12, PingPong, InOutSine, clipplane, +20, 0, 0
Will explore further !
applying an animation clause to the first setting
did not transition across left to right :-).
camera {
type: 3D
angle: 45
pos: 0, 0, 1924
clipplane: -10, 0, 0
animate: 12, PingPong, InOutSine, clipplane, +20, 0, 0
Will explore further !
TheEmu
已加入 在 Jul 2012 3309 发布
December 11, 2017
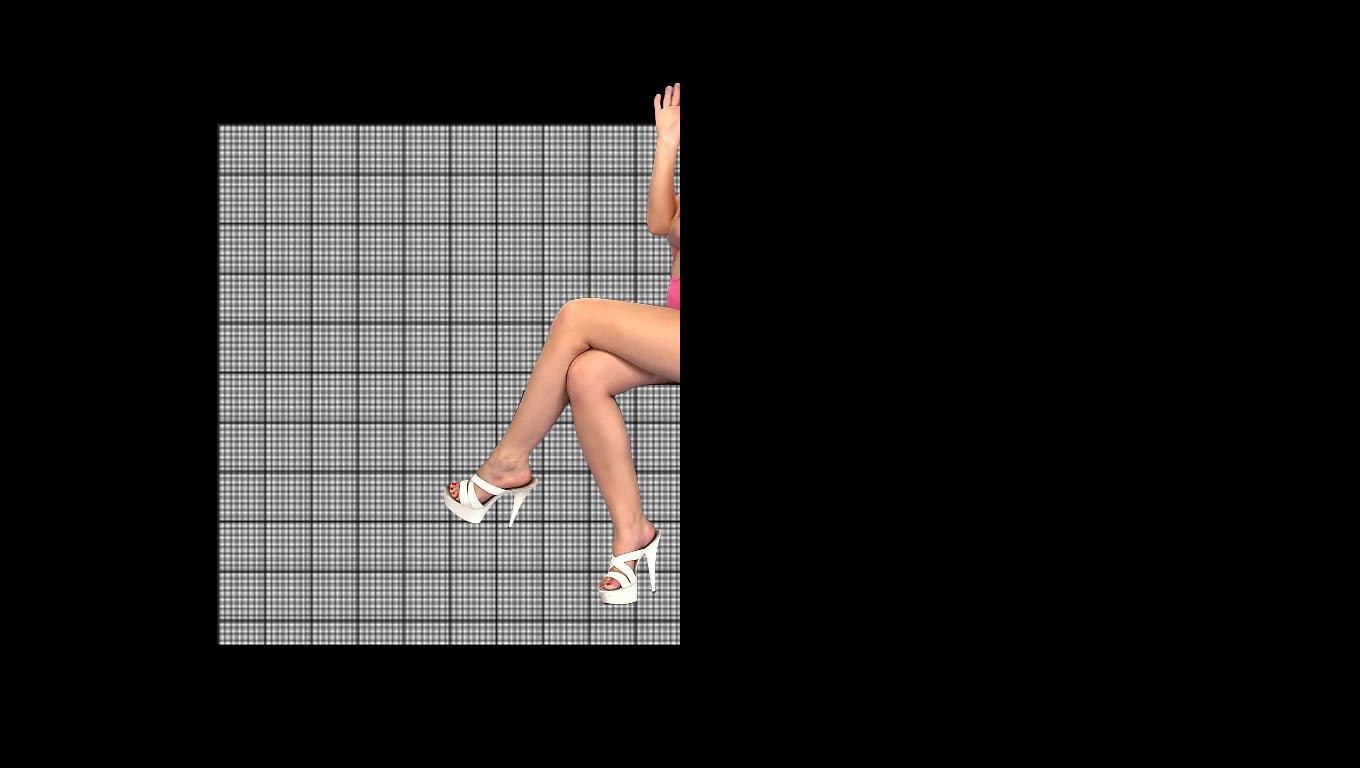
@Everthang - one thing you might try is to construct a "box" out of grids as I showed when describing how I matched the camera and the background perspective for the dodgem scene - your "graphpaper" should make an excellent basis for such a grid. That would enable you to see the clip plane slicing off part of the tube making up the floor, ceiling and sides of the grid tube - and see its orientation from the angle it intersects the floor, ceiling and sides.
Z22
已加入 在 Aug 2017 1166 发布
December 17, 2017
Was isolating the skin in my enhance shader and wondered what it would look like in the refract shader. Only vaguely tuned atm as i'm trying to minimise the checks but avoid edge conditions(yellows, purples ect)
Z22
已加入 在 Aug 2017 1166 发布
December 19, 2017
Enhancement shader is starting to fall into place.
DANO70
已加入 在 Feb 2008 742 发布
December 19, 2017
I'm interested in anything that can enhance older shows. I wish the Antialias shader didn't jag the clip edges and blur new cards I would use it more. Keep up that tinkering @Z22 that screen shot looks good and sharp.👍
Z22
已加入 在 Aug 2017 1166 发布
December 19, 2017 (edited)
Thanks, it's getting there. Only thing is with it is you really need different settings for the different resolution girls, it does work on all though, just not as well as it can with it set right for the resolution.
Will add a link to latest version...
https://drive.google.com/open?id=1EVAw4DRX75HoKqiMEhQsC03xYbOyxe4m
There are some edge cases that need fixing, eg:- some girls skin is quite yellow and the cut off threshold is below full skin level and blond hair get recognises as skin because of the same threshold being to high...err...
Some cream or pinkish clothes get picked up as skin. Need to isolate before i do the skin.
Blue shorts aren't fully isolated so they get gray patches.
purple may go blue(not many girls wearing purple though)
I haven't sorted primary green or yellow isolation yet.
Can turn some girls into Goa'uld (glowing eye's) if totem have oversharpened, seems they like to sharpen even new 3k girls...
EverthangForever
已加入 在 Oct 2009 2534 发布
December 20, 2017 (edited)

@TheEmu, srry.. i was playing with the grid boxes and been led astray by diffraction patterns among other things. Needs a proper crisp 1920 * 1080 grid graphic methink.
Useful thread started around altering .scn clip permissions posted here..@Number6 ..Thankful you got your rig up and running online again & in time. Yay !!
Grateful for these great Xmas share downloads to you and @TheEmu, both. **👌 **
Useful thread started around altering .scn clip permissions posted here..
http://www.istripper.com/forum/thread/38338/1?post=563863
关于iStripper的一切 / Full SCREEN problems
how come when i right click on a girl, thats already performing, and i launch Full screen. it NEVER PLAYS ALL CLIPS ?!?!?! it plays the card for a couple of minutes then changes card :/ on my settings...
Grateful for these great Xmas share downloads to you and @TheEmu, both. **
http://www.istripper.com/forum/thread/29408/21?post=563940
关于iStripper的一切 / Share your FullScreen - Member Created Scenes here
Sorry - I am very much playing catch-up here. My PC has been out of action virtually since Black Friday. This close to Christmas I am really struggling for time. I have a number of new Xmas scenes I w...
Z22
已加入 在 Aug 2017 1166 发布
December 27, 2017
https://www.youtube.com/watch?v=Q-v4LsbFc5c&t=0s
Interesting, so we could do 3d by delaying one side by 1 frame(sbs mode).
Interesting, so we could do 3d by delaying one side by 1 frame(sbs mode).
EverthangForever
已加入 在 Oct 2009 2534 发布
January 2, 2018 (edited)
@Z22 , I raised the possibility of time offset for clipsprites back in November.
Silence was the stern reply back then however ..lol.btw @anybody how does one formally set .scn permissions so that it excludes split body inout clips
yet it does permit full body standing from start clips to be allowed ? Below seems to work .
Silence was the stern reply back then however ..lol.
http://www.istripper.com/forum/thread/27449/50?post=558987
关于iStripper的一切 / Discussions for Scenes for Version 1.2.X Fullscreen Mode here
@Z22,..the girls are always moving here. If there was a way to delay a clone clipsprite (ever so slightly) you may get two non distorted perspectives ( a previous and a present so to speak).. nm me he...
yet it does permit full body standing from start clips to be allowed ? Below seems to work .
clip {
id: clip
deny: table, top, cage, accessories, inout
//allow: pole, standing
Z22
已加入 在 Aug 2017 1166 发布
January 2, 2018
After a bit of thinking i don't think it will actually work unless the girl isn't moving much due to the low framerate of the clips. I have thought of another method though and will have a go at testing it later. That one uses discards to remove more and more of the girl so you end up with a bunch of layers you can stack in 3d space.
The background layer is the full girl then on each new layer coming towards the camera you discard more and more of the darker pixels(based on one colours scale). That will definatly do something, just not sure how good it will look.
The background layer is the full girl then on each new layer coming towards the camera you discard more and more of the darker pixels(based on one colours scale). That will definatly do something, just not sure how good it will look.
您不允许参加!
作为iStripper 的免费用户,您不能在论坛中回答话题或创建新话题。
但您仍然可以访问基本类别并与我们的社区取得联系!