Age Verification
This website contains age-restricted material including nudity and explicit content. By entering, you confirm being at least 18 years old or the age of majority in the jurisdiction you are accessing the website from.
Our parental controls page explains how you can easily block access to this site.
0
Discussions for Scenes for Version 1.2.X Fullscreen Mode here Forum / Wszystko o iStripper
TheEmu
Dołączył: Jul 2012 3309 post(y/ów)
January 16, 2018
It would have to be an if, but I am concerned about skipping a pixel that is transparent in the bottom layer but for which a shifted upper layer is opaque - sort of the reverse of my previous problem of shifting in transparent pixels. It ought to be rare that a pixel gets shifted out of the area defined by the opaque pixels in the lowest layer but it is possible if a very bright pixel is at or near the edge of that area.
if the test is done where I want to do the culling then this would potentialy lose some opaque pixels that should be there and if it is done when all of the layers have been evaluated then it is too late to have any significant effect on the shader's average speed.
if the test is done where I want to do the culling then this would potentialy lose some opaque pixels that should be there and if it is done when all of the layers have been evaluated then it is too late to have any significant effect on the shader's average speed.
Z22
Dołączył: Aug 2017 1166 post(y/ów)
January 16, 2018
Yeh, your right, it would clip the upper layer if it goes beyond the bottom layers coverage and it looks weird if it does that, had that "bug" before.
The cull would have to be done before the layering but doesn't discard just drop out of the shader?
The cull would have to be done before the layering but doesn't discard just drop out of the shader?
Z22
Dołączył: Aug 2017 1166 post(y/ów)
January 16, 2018
maybe if the whole shader was inside an if..
psudo
if alpha > 0
do all the shader gubbins
else
r,g,b,a = 0
not sure if that would work though or just end up with the same problem as the discard.
psudo
if alpha > 0
do all the shader gubbins
else
r,g,b,a = 0
not sure if that would work though or just end up with the same problem as the discard.
TheEmu
Dołączył: Jul 2012 3309 post(y/ów)
January 16, 2018
That has the same effect as the discard. Well not quite, using the discard leaves the colour of the output pixel undefined but as it is discarded that doesn't matter unless you are preserving the output in a framebuffer.
DANO70
Dołączył: Feb 2008 742 post(y/ów)
January 16, 2018 (edited)
You guys are determind with this 3D work. I can't wait till you get all this worked out. Sadly I can't even run most any of these all the way back to your original glass work @Z22. My crap computer just can't handle them or they just display a normal stuttering model because my lame ole intel graphics. Keep it up guys..I HAVE FAITH ...LOL
Z22
Dołączył: Aug 2017 1166 post(y/ów)
January 16, 2018
Spend less money on strippers and buy a new pc :P /jk
DANO70
Dołączył: Feb 2008 742 post(y/ów)
January 16, 2018
True....LMAO😂
TheEmu
Dołączył: Jul 2012 3309 post(y/ów)
January 16, 2018 (edited)
@DANO70 - I also have an Intel Integrated Graphics Processor and it is capable of running my version of the 3D vision algorithm with up to 32 slices. In the zip file referenced in these posts there are versions that use as few as two or three layers, try some of the lower numbered test scenes and work your way up to see what your system can handle. Only the 20 slice version has a full set of test scenes (one for each of the different basic clip types) but you should be able to adapt them easily enough to fit what your system can handle - you only have to change two characters in the .scn files to get them to use one of the pre-tailored versions of the shader. You might also try changing the .scn files to use a smaller screen size - that just requires changing the values used in two size: and two pos: clauses in the .scn files.
DANO70
Dołączył: Feb 2008 742 post(y/ów)
January 16, 2018
Oh 😵 looks like I need to look at some of those. Thanks
TheEmu
Dołączył: Jul 2012 3309 post(y/ów)
January 16, 2018 (edited)
@DANO70 - I made a mistake at the end of my last post, you would also need to change one more pos: clause and a standingheight: clause. In all cases just divide the values by 2.
EDIT: I have just tried changing the sizes etc. in the .scn file and it made little if any difference. However, the advice to try the low slice number versions still stands.
EDIT: I have just tried changing the sizes etc. in the .scn file and it made little if any difference. However, the advice to try the low slice number versions still stands.
EverthangForever
Dołączył: Oct 2009 2543 post(y/ów)
January 18, 2018 (edited)
A tad off-topic but worth noting for peeps helping others to learn this .
@WA confirms GUI Cliplist is now available to everyone who owns a card regardless of membership Level. Possibly it happened with the new iStripper beta 1.2.188
@WA confirms GUI Cliplist is now available to everyone who owns a card regardless of membership Level. Possibly it happened with the new iStripper beta 1.2.188
http://www.istripper.com/forum/thread/38613/1?post=568378
Nie masz uprawnień do przeglądania tego tematu
r1617ag
Dołączył: Mar 2009 5 post(y/ów)
January 18, 2018
just downloaded latest istripper no full screen downloads of girls down from 200kbs to 32 kbs so not pleased.
January 19, 2018 (edited)
@Nasashie
Don't know if anyone else has mentioned it. but in a couple of your scenes the shadows for the inanimate objects are in different directions from the shadows of the girls dancing.
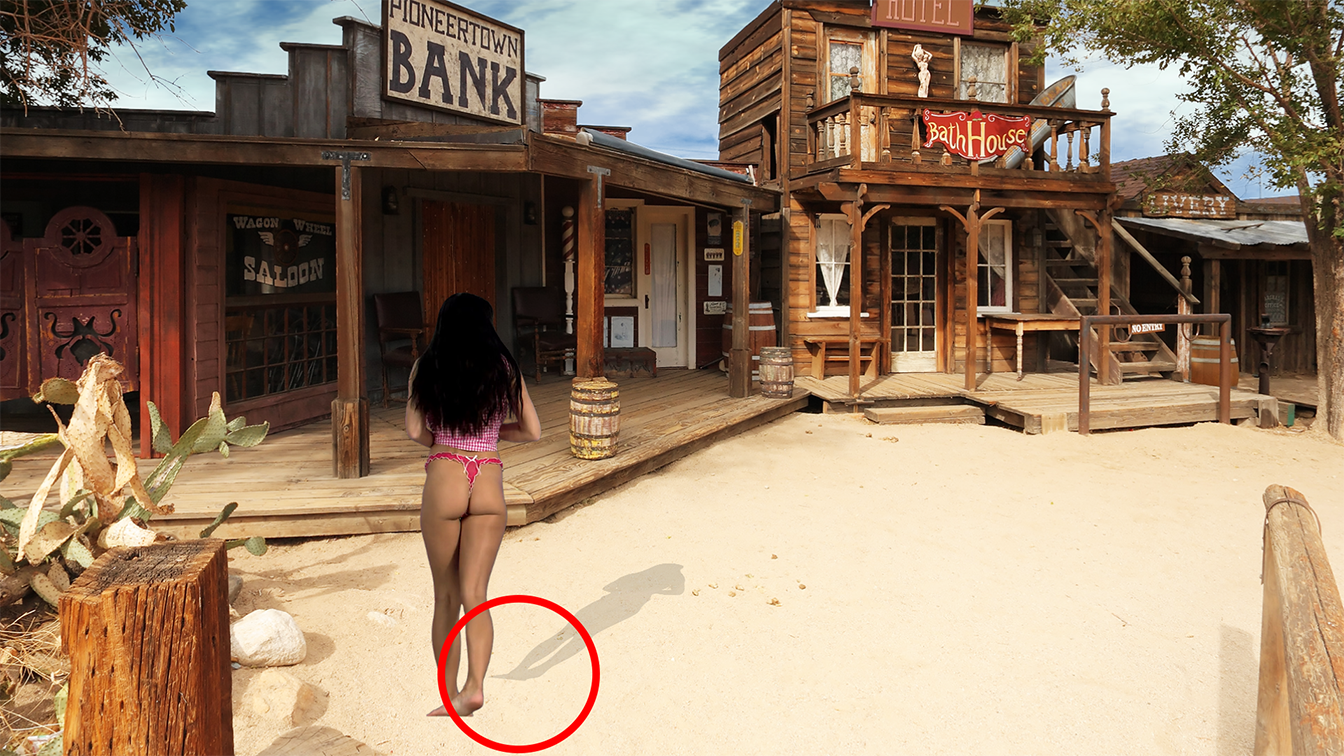
For example: in the "Tank" scene, the shadows from the fittings on the tank itself would indicate that the sun is coming from the upper left of the scene but the shadow for the dancer would indicate that the sun is coming from the upper right of the scene (through the tree).
The "Saloon" scene from today has the same issue with the shadows of the rocks on the ground and the various posts etc. heading a different direction than the shadow of the dancer.
This is NOT a complaint and being only a user, I have no idea if this is easily fixed or not or even considered an issue by others. I just noticed it, kind of right away when I started watching your work and thought to let you know about it. (Really liked watching Nekane in her little cowgirl shorts dancing in front of the Saloon by the way.. )
Thanks for your efforts on behalf of the community, sir!
EDIT: and I went back to download DANO70's scene and noticed that you mentioned something about still needing to correct the shadows... sigh
Thats what I get for trying to multitask as I get older....
Sorry about that and thanks again for the scenes!
Don't know if anyone else has mentioned it. but in a couple of your scenes the shadows for the inanimate objects are in different directions from the shadows of the girls dancing.
For example: in the "Tank" scene, the shadows from the fittings on the tank itself would indicate that the sun is coming from the upper left of the scene but the shadow for the dancer would indicate that the sun is coming from the upper right of the scene (through the tree).
The "Saloon" scene from today has the same issue with the shadows of the rocks on the ground and the various posts etc. heading a different direction than the shadow of the dancer.
This is NOT a complaint and being only a user, I have no idea if this is easily fixed or not or even considered an issue by others. I just noticed it, kind of right away when I started watching your work and thought to let you know about it. (Really liked watching Nekane in her little cowgirl shorts dancing in front of the Saloon by the way.. )
Thanks for your efforts on behalf of the community, sir!
EDIT: and I went back to download DANO70's scene and noticed that you mentioned something about still needing to correct the shadows... sigh
Thats what I get for trying to multitask as I get older....
Sorry about that and thanks again for the scenes!
EverthangForever
Dołączył: Oct 2009 2543 post(y/ów)
January 19, 2018 (edited)
http://www.istripper.com/forum/thread/29408/22?post=568567
Wszystko o iStripper / Share your FullScreen - Member Created Scenes here
All the 3D working and many recent Halloween related scene share's sparked a interest with the one I dabbled with way back around the original. I had this scene with a club background and liked it bet...
@pumpdude48 great to see you here still supporting the fullscreen. The shadows in the center of
the screen should be an easy fix like the NAS waterfall were before.
Apart from that, shadows were always difficult to control particularly as the model moves sideways & the
3D virtual geometry changes outwards from the center. They tend to drift & angles can get unrealistically acute the more to the side you go.
@TheEmu did mention a while back that he might look into an algorithm to try to modify shadow behavior. It may even involve doing something with a vertex shader type correction. I hope shadows placement and angle can be further tuned making them behave more correctly over the whoie x-axis one day.
DANO70
Dołączył: Feb 2008 742 post(y/ów)
January 19, 2018
@ET allways a pleasure to please a master.😉
TheEmu
Dołączył: Jul 2012 3309 post(y/ów)
January 19, 2018
The problem with Totem's shadow shader being used by @Nasashie is that it has to be modified if you want to change any properties of the shadow, such as its orientation or fuzzyness.
I produced a couple of more flexible shadow shaders a few months ago and placed them in my library which can be downloaded like all my work from my website.
The two shaders are
TheEmuLib.Emu_Shadow.A.1.fsh
TheEmuLib.Emu_Shadow.A.2.fsh
Both allow you to control them via uniform: parameters declared in the .scn file. The second allows you to restrict the shadow to a particular area allowing you to build up a shadow that lies partly on a floor and partly on a wall but if you just want a simple shadow the first will be the better choice. You can get them together with the rest of my library from
http://www.theemusnest.eu/scenes/Zips/TheEmuLib/0000%20-%20Basics.zip
The scenes using them in that zip file are primarily for testing the shader so they are not particularly good examples of using them, However the simpler one is used in my "Woodland" and "Music Room" scenes both which you can use as practical examples of their use. These are part of my "Misc" scenes which can be downloaded from
http://www.theemusnest.eu/scenes/Zips/TheEmu%20=%20Misc.zip
The problem refered to by @EverthangForever regarding angles changing only applies to scenes that use a 3D camera. You can avoid it by using a 2D camera or reduce it by using a 3D camera placed at a large distancebut with a small angle of view (e.g. 5 degrees rather than the 45 degrees commonly used) - i.e. use a camera with a lens that has a long focal length from a long way away rather than a wide angle lens closer to the subject.
Nasashie
Dołączył: Jan 2018 25 post(y/ów)
January 19, 2018 (edited)
@pumpdude48 Indeed, if you notice on my two posts for the scenes I noted, but I trouner the parameters in all directions I can not manage! That's why I asked for help ... but no one had to notice :/ So I was waiting to see if someone would offer me a solution to fix it in an update xD ! And thank you for your return!
DANO70
Dołączył: Feb 2008 742 post(y/ów)
January 19, 2018
@ADMIRERZ
Glad you like it.
Glad you like it.
TheEmu
Dołączył: Jul 2012 3309 post(y/ów)
January 19, 2018 (edited)
@EverthangForever - An additional comment regarding shadows in with 3D cameras.
For shadows on a horizontal surface the "correct" procedure would be to have the shadow be in a horizontal plane by performing roughly the following procedure in the .scn file
1) Rotate what is to become the shadow into the horizontal plane by rotating by 90 degrees the X axis (this can only be done if you use a 3D camera)
2) Set its colour to some shade of dark grey and make it partialy transparent
3) Use a "shadow" shader like mine to blur its edges and to skew it
If you do this rather than try to fake it out by rendering the shdow in a vertical plane then this should automatically correct the unrealisticly acute angles that you refer to. But there are three caveats to this
1) The simple shadow shaders assume a distant light source casting the shadows so there will be no change in the shadow direction as what is casting the shadow moves. With a closer light source the shdows should always point back to it and hence their orientation should change as the object moves.
2) The method only really works if the perspective of the scene due to camera position, direction of view and field of view match that of the background image for the scene.
3) If you have a wide angle of view for the camera, and the 45 degrees commonly used qualifies as such, then even though the scene may be rendered acurately it may still look rather odd. This is rather like a close up of a face photographed with a wide angle lens will typically exagerate the size of the subjects nose or mouth, or like pictures of skyscrapers look as if they taper (unless you have used an expensive perspective correcting lens or have applied perspective corrrection postprocessing to the image) whereas when you look at them with the naked eye this is not noticed.
EverthangForever
Dołączył: Oct 2009 2543 post(y/ów)
January 20, 2018 (edited)
@TheEmu, thanks for this. I recall experimenting with longer 3D camera distances and tilting of the shadow plane several years ago around the time @Avatarr was playing with beds on a beach in Miami.scn and could not quite get the shadows to stay consistent.The trade off pour moi was (and still is) being too enamoured with animations of the camera z axis among other things to bother further with tailoring scenes to shadows. I will have a look at it in good time, however use of shaders disable many of the .scn clipsprite parameters like rot: and scale: that we are used to using freely up to now in favor of cross-referenced shader uniforms. Shadows are more in the realm of peeps such as @Nasashie and @titii wanting to create super photographic realistic outdoor type scenes in bright light - something that authors effectively shied away from after the pre-shader styled Miami.scn. The simplest solution for @NAS atm maybe is to photoshop out the rocks and other shadows.
edit: I had big hopes clipplane parameter would allow subnodes of the camera node to give differential use of it in order to truncate targetted (shadow/reflection) clipsprites only. however I have tried playing with that thus far to no avail.
http://www.istripper.com/forum/thread/27449/9?post=457727
Wszystko o iStripper / Discussions for Scenes for Version 1.2.X Fullscreen Mode here
Hello there. I am trying to master the next idea, and i have a question. Two, actually. 1. Is there a way to make proper shadows (see the left girl)? 2. Where should i host a zip with scene(s) so mods...
edit: I had big hopes clipplane parameter would allow subnodes of the camera node to give differential use of it in order to truncate targetted (shadow/reflection) clipsprites only. however I have tried playing with that thus far to no avail.
DANO70
Dołączył: Feb 2008 742 post(y/ów)
January 20, 2018 (edited)
@Nasahsie
I forgot to thank ya for the "round up pardner"....lol
Also don't worry about making a mistake these guys will sort it and glad to help you...I'm prove.😀
I forgot to thank ya for the "round up pardner"....lol
Also don't worry about making a mistake these guys will sort it and glad to help you...I'm prove.
TheEmu
Dołączył: Jul 2012 3309 post(y/ów)
January 20, 2018 (edited)
@EverthangForever - you can get rot: and scale: to work with a sprite or clipsprite that uses a shader by nesting it in node and moving the rot: and scale: out to the node
So instead of
use
this works for pretty much all of the properties other than color: and opacity: which you have to handle in shader by multiplying its output, gl_FragColor, by gl_Color.
Another way to do things is to render the clip into a framebuffer without using the shader and then use that framebuffer as the source for a sprite in the camera node (or in a another framebuffer) and use the shader for that sprite. Or you can do the reverse, render the clip with the shader into a framebuffer and use that framebuffer as a sprite in the camera node.
So instead of
clipSprite {
source: myGirl
rot: 90, 0, 0
]
use
node {
rot: 90, 0, 0
clipSprite {
source: myGirl
shader: MyShader.fsh
]
}
this works for pretty much all of the properties other than color: and opacity: which you have to handle in shader by multiplying its output, gl_FragColor, by gl_Color.
Another way to do things is to render the clip into a framebuffer without using the shader and then use that framebuffer as the source for a sprite in the camera node (or in a another framebuffer) and use the shader for that sprite. Or you can do the reverse, render the clip with the shader into a framebuffer and use that framebuffer as a sprite in the camera node.
EverthangForever
Dołączył: Oct 2009 2543 post(y/ów)
January 20, 2018 (edited)

Clear as mud @Maestro...lol.
Ok i will give it a go, however our .scn files are getting very nested & framebuffered these days and hope this will not slow down or load everyones' GPU's. It is also harder to insert code into other .scn's using open directory images of different size, when it reqires specific .png's in a bunch of framebuffers. AKA = not very portable.;-/
edit: btw @Nasashie your model occluding glow in the airport .scn is outstanding bon👌
Ok i will give it a go, however our .scn files are getting very nested & framebuffered these days and hope this will not slow down or load everyones' GPU's. It is also harder to insert code into other .scn's using open directory images of different size, when it reqires specific .png's in a bunch of framebuffers. AKA = not very portable.;-/
edit: btw @Nasashie your model occluding glow in the airport .scn is outstanding bon
TheEmu
Dołączył: Jul 2012 3309 post(y/ów)
January 20, 2018
@EverthangForever - Using nested nodes should make no difference to GPU usage and only a tiny amout to CPU usage. Of course using extra node allows you to do more complicated stuff and that can affect the CPU or GPU usage but as long as it doesn't involve more shaders or more clips any extra nodes should make no noticable difference (unless you use thousands of them). Adding framebuffers could be expected to increase the GPU load, but the effect there seems to be rather less than I would have expected.
Nasashie
Dołączył: Jan 2018 25 post(y/ów)
January 20, 2018
@DANO70 I'm sorry but i don't understand, my english it's so bad !
@EverthangForever Thank you but I did not invent anything! I used the scene Xmas to recover their effect and I adapted it to mine. I removed the effect of Christmas tree and fire, then I corrected the dentist of the light effect
But I'm really too bad with the shadows. So if someone finds how to correct them according to the shadow of the background I am a taker!
EverthangForever
Dołączył: Oct 2009 2543 post(y/ów)
January 20, 2018 (edited)

@NAS it is no problem...try doing this in Nasashie - Saloon.scn
Put this code ~ just above the camera node in the .scn
next listed shadow clipsprite without the shader stuff all within a new father node:, to replace previous code as @TheEmu suggests
It is a good idea to save edits as a new file name like Saloon02.scn BEFORE you start editing
so that you can compare later what was changed. Good luck with it !
Put this code ~ just above the camera node in the .scn
then maybe play with the camera Y axis angle convergence a tad ;-)
framebuffer {
id: shadow
source: Clip
shader: shadowClip.fsh
uniform: orientation, vec2, 1, 0
uniform: changeColor, int, 0
}
then where you have '// blurred shifted shadow', nest or { brackets { within } brackets} the
camera {
type: 3D
angle: 45, -15 //slighter angle on y axis
pos: -0, -540, 1300
target: -0, -540, 0
next listed shadow clipsprite without the shader stuff all within a new father node:, to replace previous code as @TheEmu suggests
/////blurred shifted shadow
node {
rot: 90, 0, 0
scale: -0.72, 1.15
clipSprite {
pos: -160, -115, 10
source: Clip
material: true
standingheight: 900
source: shadow, 1
//shader: shadowClip.fsh
//uniform: orientation, vec2, 1, 0
//uniform: changeColor, int, 0
opacity: 0.25
}
}
It is a good idea to save edits as a new file name like Saloon02.scn BEFORE you start editing
so that you can compare later what was changed. Good luck with it !
Nasashie
Dołączył: Jan 2018 25 post(y/ów)
January 20, 2018
If a take :
I have a problem with rotation ! And I do not understand how I can fix the shadow in relation to the clip
/////blurred shifted shadow
node {
rot: 90, -15, 0
scale: -0.72, 1.15
clipSprite {
pos: -130, -195, 10
source: Clip
material: true
standingheight: 900
source: shadow, 1
//shader: shadowClip.fsh
//uniform: orientation, vec2, 1, 0
//uniform: changeColor, int, 0
opacity: 0.15
}
}
I have a problem with rotation ! And I do not understand how I can fix the shadow in relation to the clip
EverthangForever
Dołączył: Oct 2009 2543 post(y/ów)
January 20, 2018 (edited)
I needed to run node 'shifted shadow' clipsprite at
pos: -160, -115, 10 and rot: 90, 0, 0
then the normal model clipsprite as:
pos: -160, -115, 10 and rot: 90, 0, 0
then the normal model clipsprite as:
//clip
clipSprite {
pos: 100, -75, 40
standingHeight: 580
scale: -1, 1, 1
source: Clip
}
Nasashie
Dołączył: Jan 2018 25 post(y/ów)
January 20, 2018

Yes but if i take this :
I have this ! How I can put a rotation but keep the clip in connection with the shadows ?
/////blurred shifted shadow
node {
rot: 90, -15, 0
scale: -0.72, 1.15
clipSprite {
pos: -160, -115, 10
source: Clip
material: true
standingheight: 900
source: shadow, 1
//shader: shadowClip.fsh
//uniform: orientation, vec2, 1, 0
//uniform: changeColor, int, 0
opacity: 0.15
}
}
I have this ! How I can put a rotation but keep the clip in connection with the shadows ?
Brak spełnionych wymagań by wziąć udział w dyskusji.
Jako darmowy użytkownik programu iStripper, nie możesz odpisywać w tematach na forum ani tworzyć nowych tematów.
Masz jednak dostęp do podstawowych kategorii dzięki którym możesz pozostawać w kontakcie ze społecznością !