Age Verification
This website contains age-restricted material including nudity and explicit content. By entering, you confirm being at least 18 years old or the age of majority in the jurisdiction you are accessing the website from.
Our parental controls page explains how you can easily block access to this site.
0
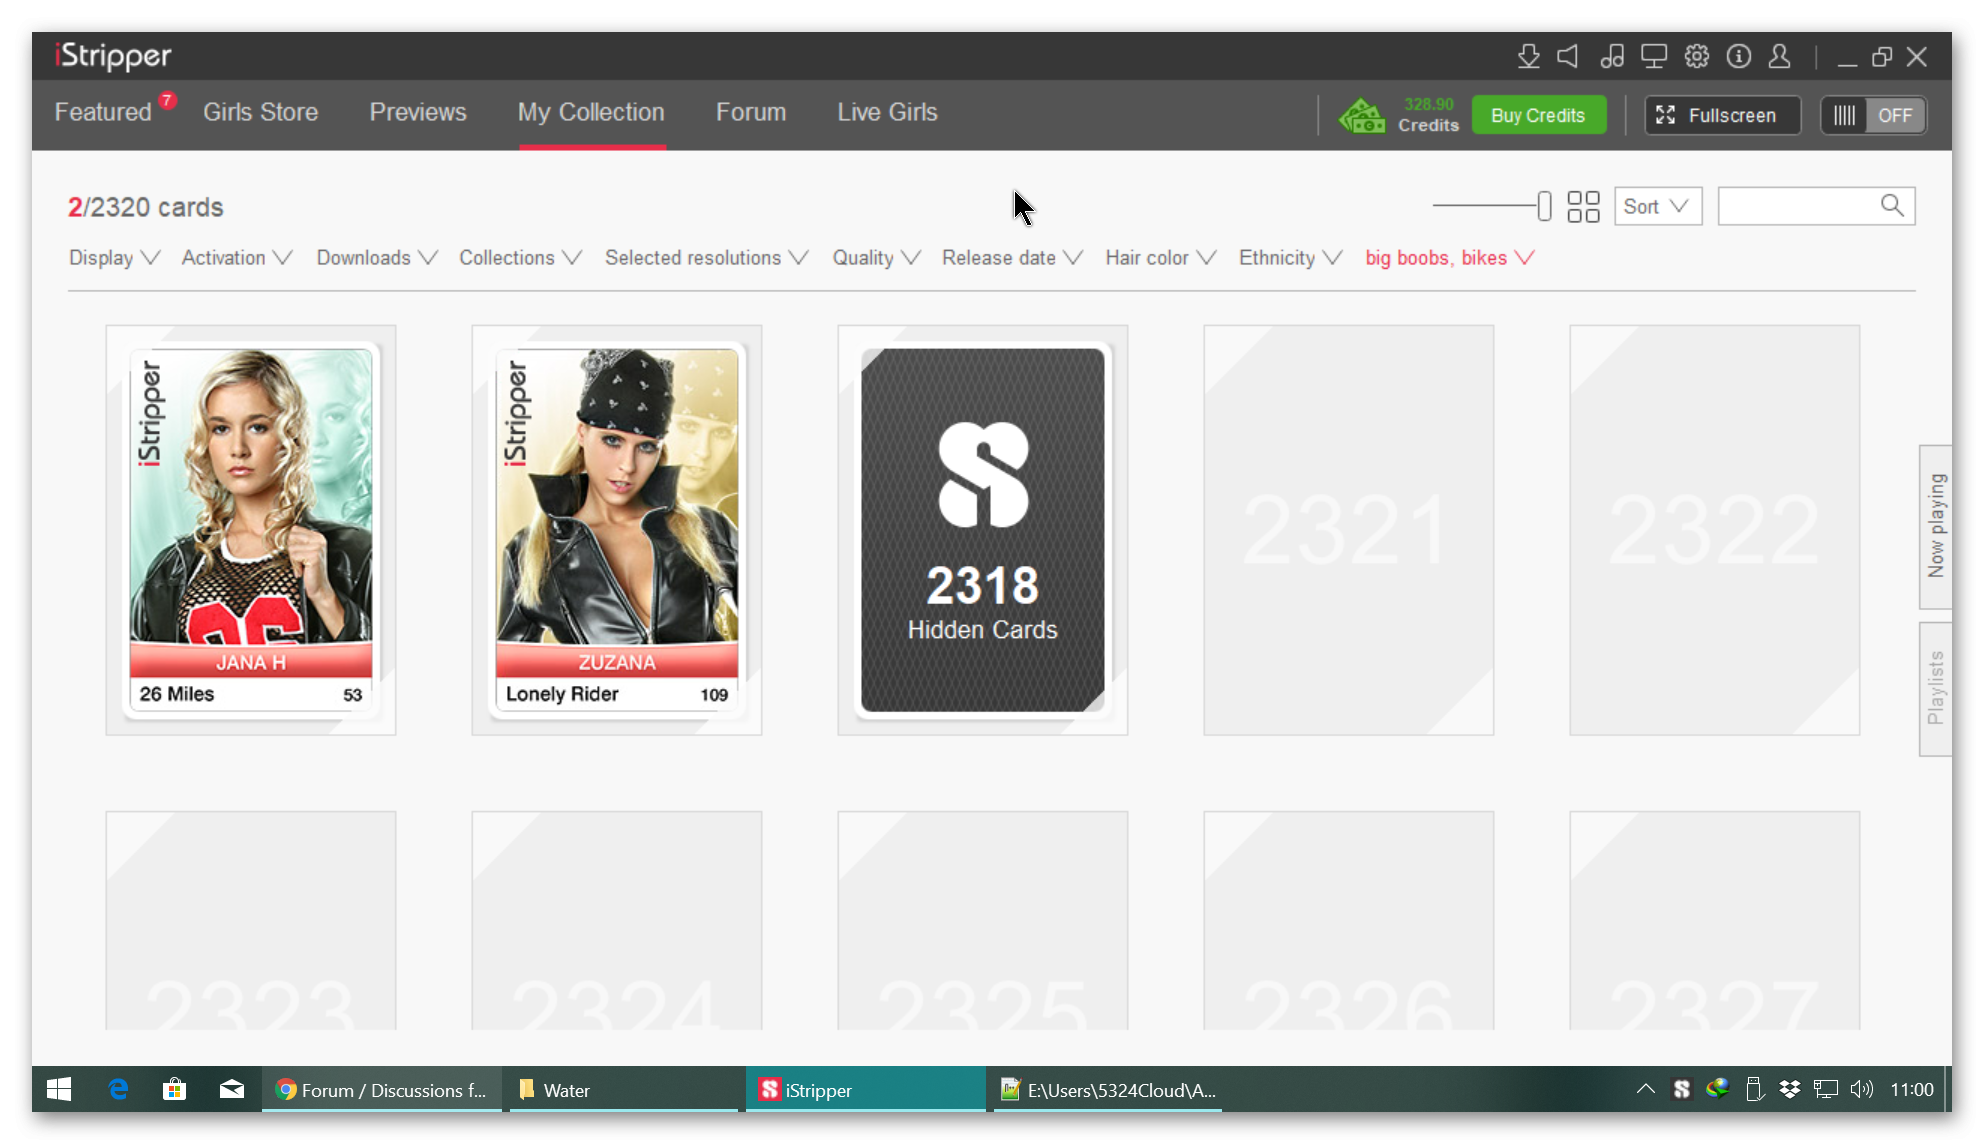
Discussions for Scenes for Version 1.2.X Fullscreen Mode here Forum / Everything about iStripper
DrDoom9
Joined in Dec 2008 241 post(s)
November 2, 2018
category: big boobs, bikes //does not work. big boobs are ignored
category: bikes, big boobs //does not work. bikes are ignored
category: bikes, big boobs //does not work. bikes are ignored
DANO70
Joined in Feb 2008 742 post(s)
November 2, 2018 (edited)
Totem has never really finished the implamenting the catagories in scenes. Only one catagory can be used that I can tell. They have yet to add all the various catagories as well. I don't even mess with this feature myself because of it's problems.
DANO70
Joined in Feb 2008 742 post(s)
November 3, 2018
This is the place for what he's asking. Catagory use in full screen scenes, not the filters in the GUI.
DANO70
Joined in Feb 2008 742 post(s)
November 3, 2018 (edited)
@R2D34ever2
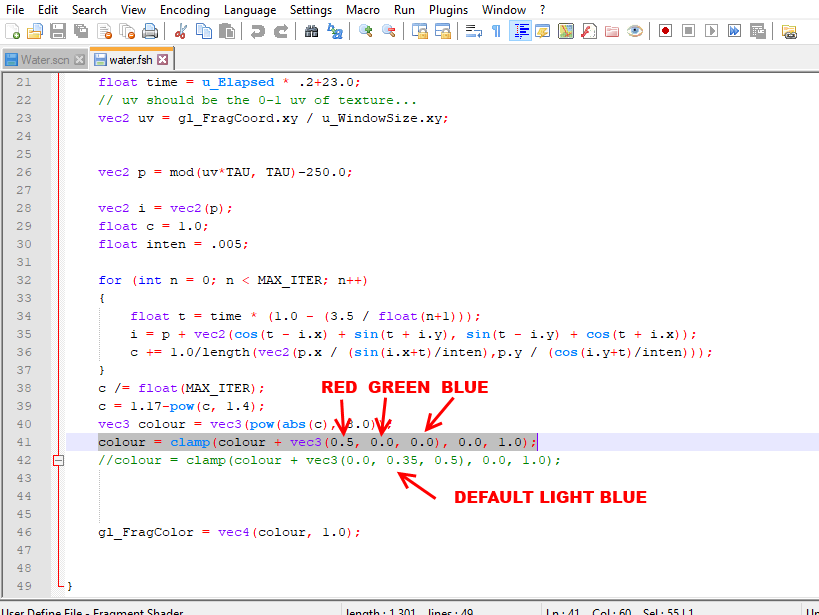
Just going to post here for those wanting to change the color of the water in Totem's water scene.
Editing the shader (.fsh) file and changeing this line to your color choices is all you need to do.
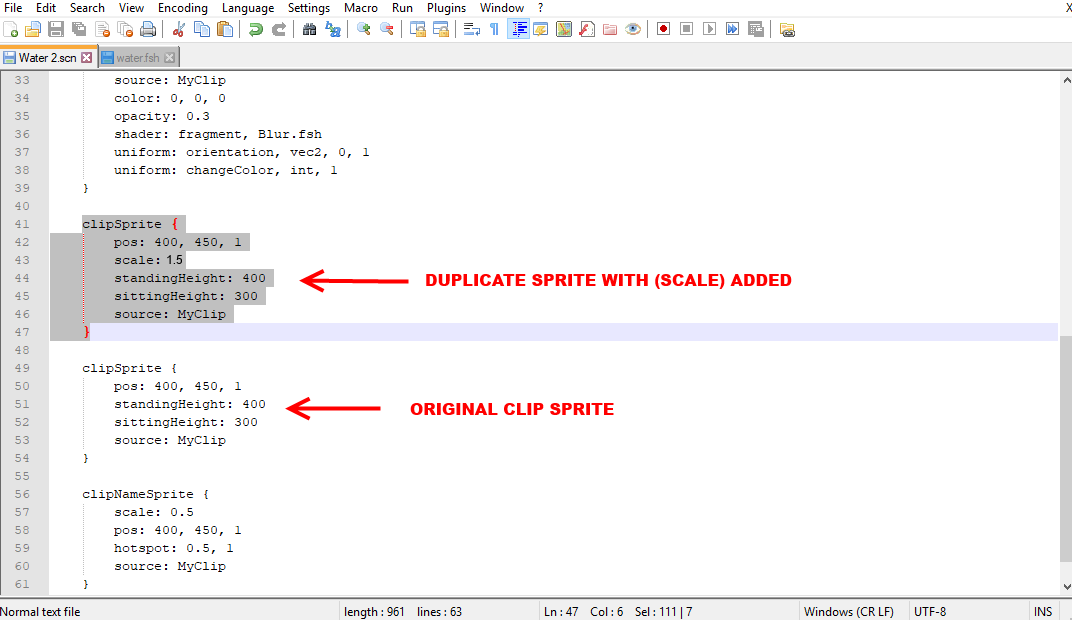
To add a extra clip just duplicate the clip sprite section in the (.scn) file and change the (pos:) settings or add a (scale:) setting to it to zoom it in.
All of this is basic quick settings I did so adjust (pos), (scale) and color numbers to where and what you want things to be on screen.
Just going to post here for those wanting to change the color of the water in Totem's water scene.
Editing the shader (.fsh) file and changeing this line to your color choices is all you need to do.
To add a extra clip just duplicate the clip sprite section in the (.scn) file and change the (pos:) settings or add a (scale:) setting to it to zoom it in.
All of this is basic quick settings I did so adjust (pos), (scale) and color numbers to where and what you want things to be on screen.
x26638184
Joined in Oct 2018 189 post(s)
November 3, 2018
@wildanimal, Thanks for the help, I am being fed up.
Strange not being able to have specific control over color (Ex: Pantone 430 + Pantone 2860). There are RGB equivalences for this, but I do not understand how to achieve them here.
The logo time when the iStripper logo appears, can it be adjusted?
You can define the exact location (Example: left corner, center location, size 30x100?)
@TheEmu, Your work is great, the reality control that is achieved in many scenes is amazing. (Atmosphere, reflection of light on objects, shadows) and everything necessary to look "real".
My children are very fans of VideoJuegos and last night I talked to them about this: "See how they develop what you like!" They were surprised. And one asked: Can I study that?
This is fascinating!
DANO70
Joined in Feb 2008 742 post(s)
November 3, 2018 (edited)
@7171al71
You can only remove the the logo in scenes or use bigger images, you can't change there positions or time. You can make a image with the logo placed left, right, bottom in say a 1920x1080 transparent .png image and get the same effect as if they were in different parts of the screen.
As for color it works from 0.1-1 for each color. 0.1 being very light and 1 being the full color. When you mix the colors together is when the various other spectrum of colors come in.
x26638184
Joined in Oct 2018 189 post(s)
November 3, 2018 (edited)
@R2D34ever2....Thanks!!!!!
This is beautiful (I add shadows and reflections)
What color model is used?
I use RGB and CMYK generally, but I see that another one is used here
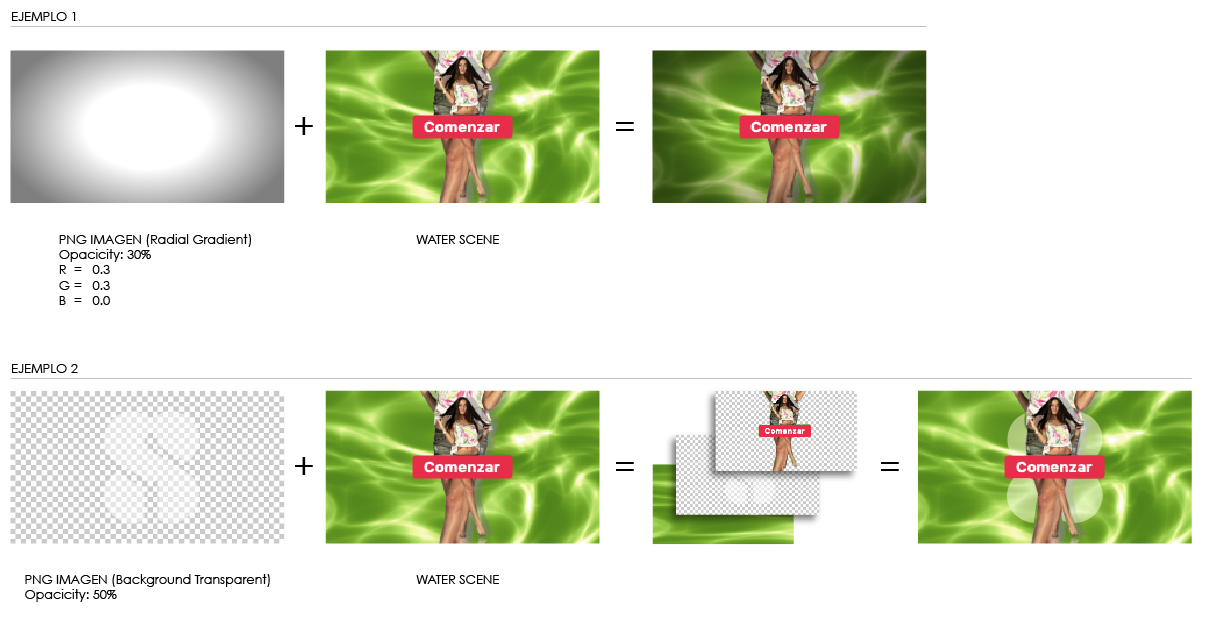
colour = clamp(colour + vec3(0.5, 0.3, 0.0), 0.0, 1.0);
0.5 = Red (ok)
0.3 = Blue (ok)
0.0 = Green (ok)
Subsequent values, which indicate?
0.0 =?
1.0 =?
This is beautiful (I add shadows and reflections)
What color model is used?
I use RGB and CMYK generally, but I see that another one is used here
colour = clamp(colour + vec3(0.5, 0.3, 0.0), 0.0, 1.0);
0.5 = Red (ok)
0.3 = Blue (ok)
0.0 = Green (ok)
Subsequent values, which indicate?
0.0 =?
1.0 =?
DANO70
Joined in Feb 2008 742 post(s)
November 3, 2018
@7171al71
I'm not a expert on shader codeing, someone else could help with what the other 2 colors are for because I don't know. I just know the 3 to change here. I don't know what the exact color model that is used either. It's been discussed I just don't remember and where it was on the forum. Sorry.
My name is DANO70 by the way. I'm guessing names are getting mixed up in translation.😆
I'm not a expert on shader codeing, someone else could help with what the other 2 colors are for because I don't know. I just know the 3 to change here. I don't know what the exact color model that is used either. It's been discussed I just don't remember and where it was on the forum. Sorry.
My name is DANO70 by the way. I'm guessing names are getting mixed up in translation.
TheEmu
Joined in Jul 2012 3309 post(s)
November 3, 2018
Colours are normally vec4 quantities, the four components being the Red. Green and Blue intensities while the fourth is the alpha channel which controls the opacity. However in your example the variable Colour has only three components, Red, Green and Blue. The function clamp takes three arguments and imposes limits on the range of its first argument. In your case it ensures that the values of each of the R,G,B components of the expression
colour + vec3(0.5, 0.3, 0.0)
stay in the range 0.0 to 1.0
colour + vec3(0.5, 0.3, 0.0)
stay in the range 0.0 to 1.0
DANO70
Joined in Feb 2008 742 post(s)
November 3, 2018
Thank you @TheEmu as allways.👍
Z22
Joined in Aug 2017 1166 post(s)
November 4, 2018 (edited)
colour = clamp(colour + vec3(0.5, 0.3, 0.0), 0.0, 1.0);
Means the final result of "colour + r,g,b" is clamped between 0.0 and 1.0 so a result of 1.5, -0.5, 1.3 would actually result in 1.0, 0.0, 1.0 (this particluar calculation is unlikely to give a negative result though so it's just for referance)
This is a clunky way of doing it though as it effectivly cuts off colour detail.
It's better to find out what the maximum result actually is by temporarly adding an
if((color.r)>1.0)
{
discard;
}
that will turn the pixel black if the value is larger than 1.0, keep adjusting it to a larger value until it no longer results in a discard
(black pixels) eg:1.5
once you have found out the maximum for each colour you can remove the if/discard section and then use this..
//start1 is the input range
//start2 is the output range
//float Color = start2 + (stop2 - start2) * ((value - start1) / (stop1 - start1)); //reference
so...
float redout = 0.5 + (1.0 - 0.5) * ( (color.r - (0.5) ) / (1.5 - (0.5) ) );
This will remap the range 0.5 to 1.5 into 0.5 to 1.0
final code would look like(assumes the max is 1.5)...
colour = colour + vec3(0.5, 0.3, 0.0);
float redout = 0.5 + (1.0 - 0.5) * ( (color.r - (0.5) ) / (1.5 - (0.5) ) );
float greout = 0.5 + (1.0 - 0.5) * ( (color.g - (0.5) ) / (1.5 - (0.5) ) );
float bluout = 0.5 + (1.0 - 0.5) * ( (color.b - (0.5) ) / (1.5 - (0.5) ) );
vec3 finalcolour = vec3(redout,greout,bluout);
Z22
Joined in Aug 2017 1166 post(s)
November 4, 2018 (edited)
You can do some really screwy things with remaping the range eg:-
//add at the start of the shader
uniform float u_Elapsed;
// after the color + vec3......
float redout = 0.5 + (1.0 - 0.5) * ( ( (color.r*sin(u_Elapsed)) - (0.5) ) / (1.5 - (0.5) ) );
this will move the max range up and down in a sign wave.
a slower cycle would be ...
(color.r*sin(u_Elapsed*0.1)) //one tenth speed
a much smaller variation would be
(color.r+((1.0*sin(u_Elapsed))/10.0)
x26638184
Joined in Oct 2018 189 post(s)
November 4, 2018 (edited)
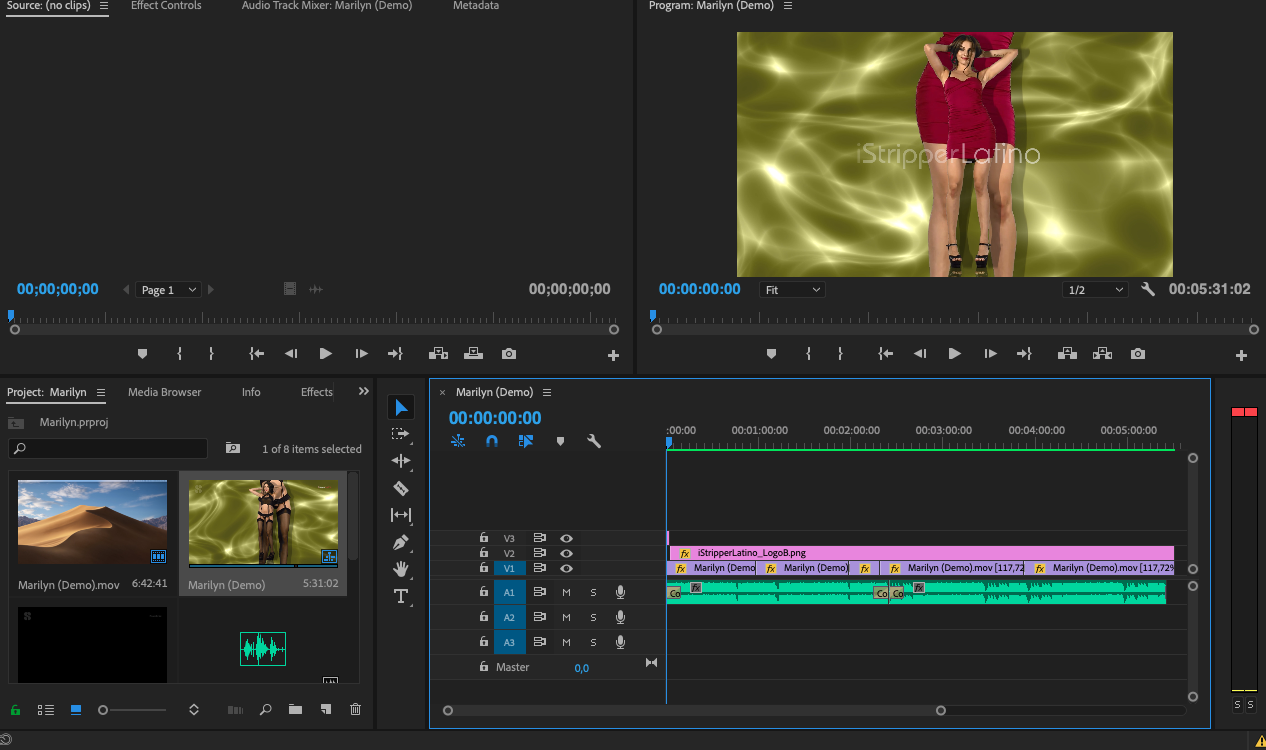
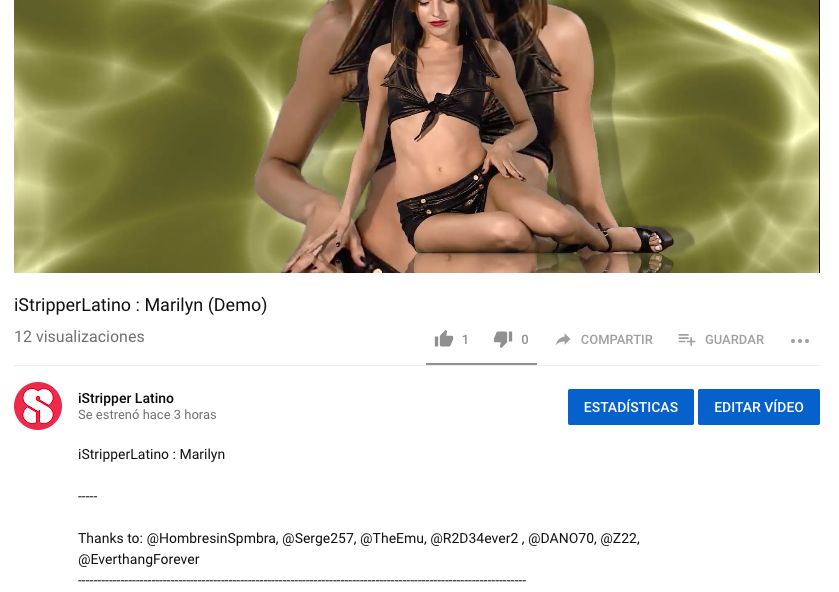
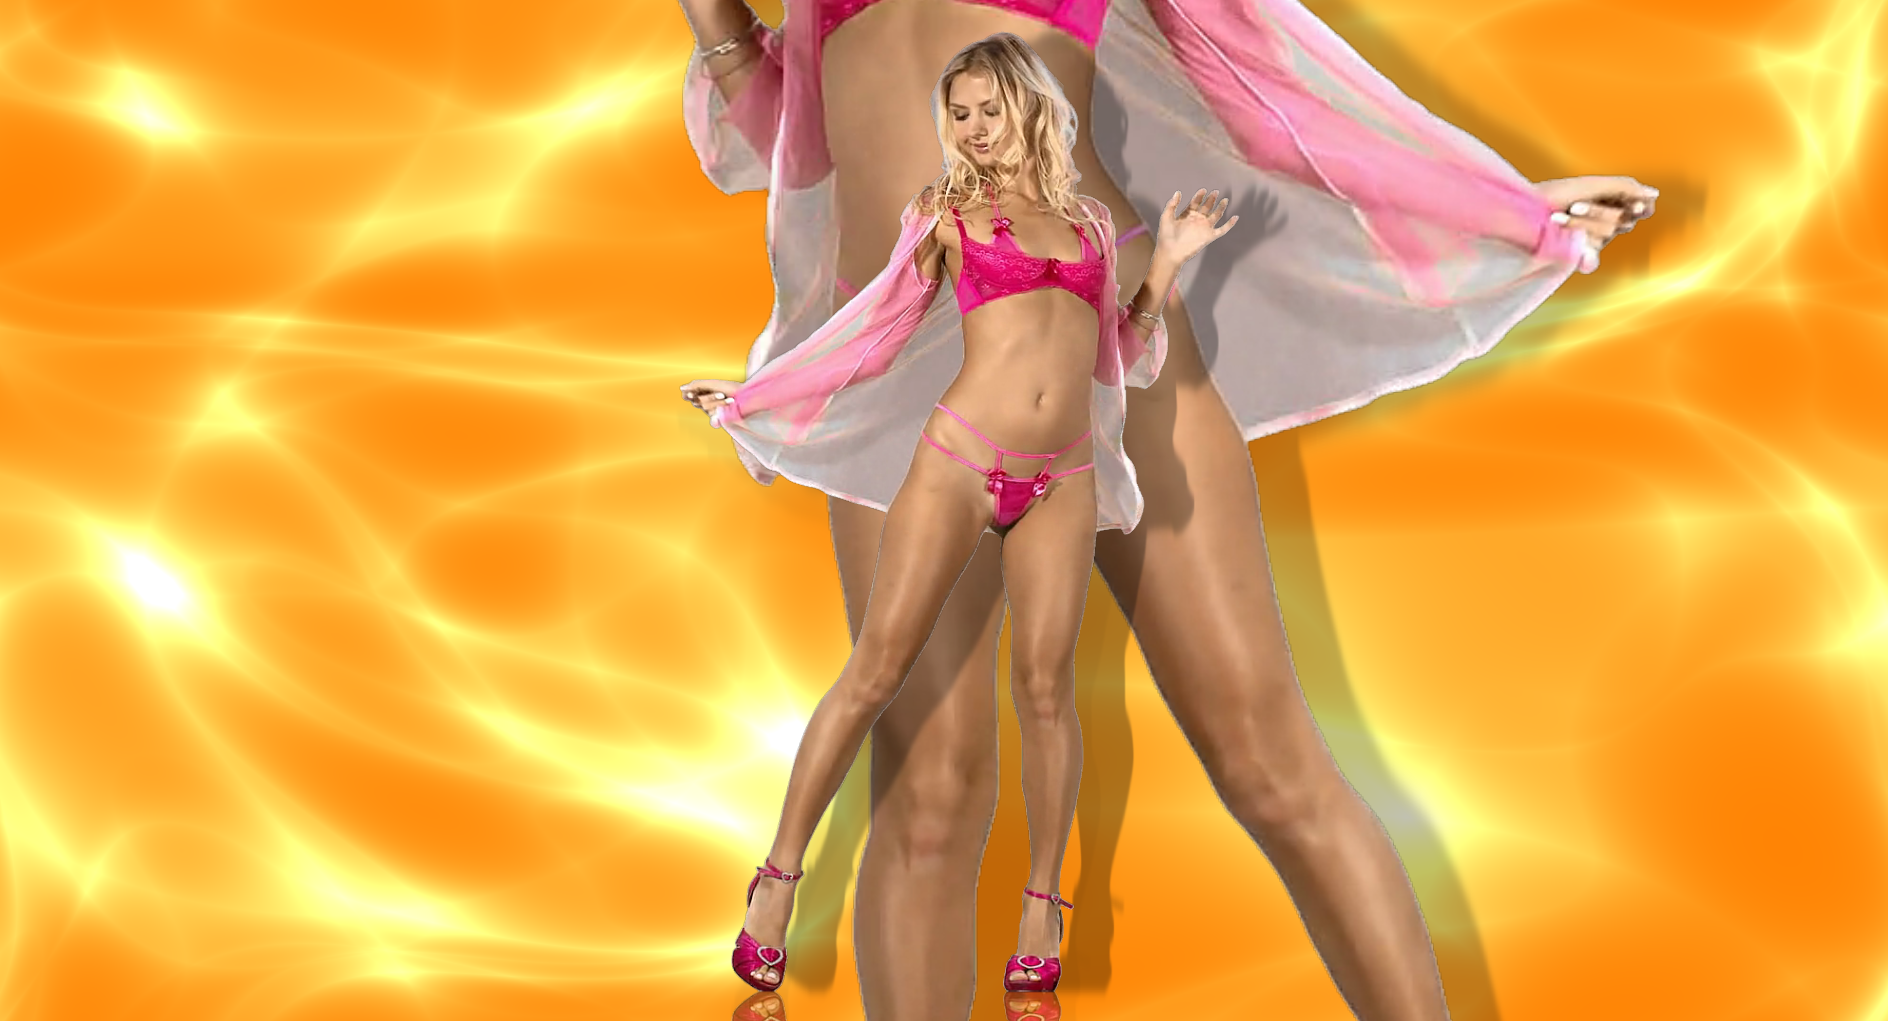
I am combining several software here to get the best out of each one. I had the intention of removing everything from iStripper, but the lack of control of many things makes the process very slow (inexperience on my part).
For example in Illustrator I have made the logo, I put it where I want, the color I want, if it is transparent or not and then I export it as .png
In premiere I can edit quickly and work with layers with precise control.
In one layer the boot logo, in another the logo of the corner with watermark, in another the clips (that I can cut, add transitions and more) and in another the audio.
--
Note: add them in the credits
TheEmu
Joined in Jul 2012 3309 post(s)
November 4, 2018 (edited)
@7171al71 - apart from creating the logo in the first place you can do all of that via the .scn file, the basic procedure would be
1) Declare a Texture with your logo as its Source:
2) Declare a Sprite with that Texture as its source
... Use Pos: clauses to position it
... Use Size: clauses to control its size
... Use Color: clauses to adust its colour
... Use Opacity: clauses to control its transparancy
... Use Rot: clauses to control its orientation
3) Optionaly use Animate: clauses for all of the above properties. In particular animate the opacity to control when it appears, how long it stays visible and the frequency at which it appears.
With respect to layers, every scene element, i.e. every Quad, Sprite, ClipSprite or ClipNameSprite comptises its own layer.
It is all a bit clunky and limited compared with a fully fledged video editor, but you can do a lot with just the .scn files (my Carousel's being an example of that) and a lot more, but with much more effort, usnig Vertex and Fragment shaders.
Maybe someday there will be a graphical front end, but for now all scene editing has to be done "the hard way" using a text editor.
TheEmu
Joined in Jul 2012 3309 post(s)
November 4, 2018 (edited)
@Z22 -
if you understand vectors as mathematical objects in their own right (rather than just being a shorthand for a list of numbers) it is usually easier to use them so the above reduces to
Though in practice I hope that at least most of the numerical values would not be hardcoded like that but come from somewhere else as named constants or variables.
final code would look like(assumes the max is 1.5)...
colour = colour + vec3(0.5, 0.3, 0.0);
float redout = 0.5 + (1.0 - 0.5) * ( (color.r - (0.5) ) / (1.5 - (0.5) ) );
float greout = 0.5 + (1.0 - 0.5) * ( (color.g - (0.5) ) / (1.5 - (0.5) ) );
float bluout = 0.5 + (1.0 - 0.5) * ( (color.b - (0.5) ) / (1.5 - (0.5) ) );
vec3 finalcolour = vec3(redout,greout,bluout);
if you understand vectors as mathematical objects in their own right (rather than just being a shorthand for a list of numbers) it is usually easier to use them so the above reduces to
colour = colour + vec3(0.5, 0.3, 0.0);
vec3 finalcolour = 0.5 + (1.0 - 0.5) * ( (color - (0.5) ) / (1.5 - (0.5) ) );
Though in practice I hope that at least most of the numerical values would not be hardcoded like that but come from somewhere else as named constants or variables.
Z22
Joined in Aug 2017 1166 post(s)
November 4, 2018
The red/green/blue channels may not have the same max value or you may want to do colour correction so you would need all three seperate for those. By compressing it down he could have missed a usefull trick.
Z22
Joined in Aug 2017 1166 post(s)
November 4, 2018 (edited)
colour = colour + vec3(0.5, 0.3, 0.0);
vec3 maxcolor = vec3(1.45, 1.42, 1.44);
vec3 finalcolour = 0.5 + (1.0 - 0.5) * ( (maxcolor - (0.5) ) / (1.5 - (0.5) ) );
would work fine i guess
vec3 maxcolor = vec3(1.45, 1.42, 1.44);
vec3 finalcolour = 0.5 + (1.0 - 0.5) * ( (maxcolor - (0.5) ) / (1.5 - (0.5) ) );
would work fine i guess
TheEmu
Joined in Jul 2012 3309 post(s)
November 4, 2018 (edited)
@z22 - you never lose any capability by using vectors. All of the numbers could have been vectors to allow different factors to be for each colour component.
I find that in most cases using vectors rather than operating on each component seperately has two advantages
1) There is less code to understand, which among other benefits means
... it is clear that the same thing is being done to each component
... there is much less possibility for "cut and paste" errors
3) It often suggests a useful generalisation of the operation.
But you have to get into the habit of thinking about vectors as mathematical objects rather than as just a programming shorthand to get the benefits.
Z22
Joined in Aug 2017 1166 post(s)
November 4, 2018
I see your point, i was just approacing it as i did at first. I do try to pack things down a bit now though a lot of the time i find it too much of a ballache to redo most of my experimental code, especially when i still need to do more work to get it running corectly and find where i need different values for each color and where i dont.
That example came from my enhanceM shader which can be and does need to be compacted down.
That example came from my enhanceM shader which can be and does need to be compacted down.
x26638184
Joined in Oct 2018 189 post(s)
November 4, 2018
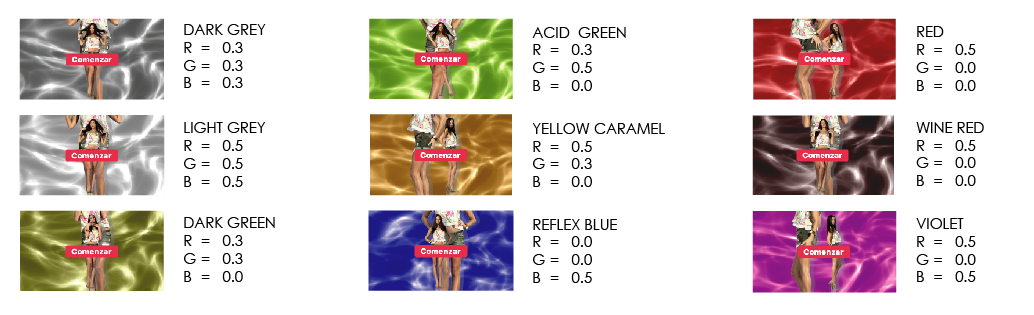
Contributing to the theme, I leave a guide with some colors
x26638184
Joined in Oct 2018 189 post(s)
November 4, 2018
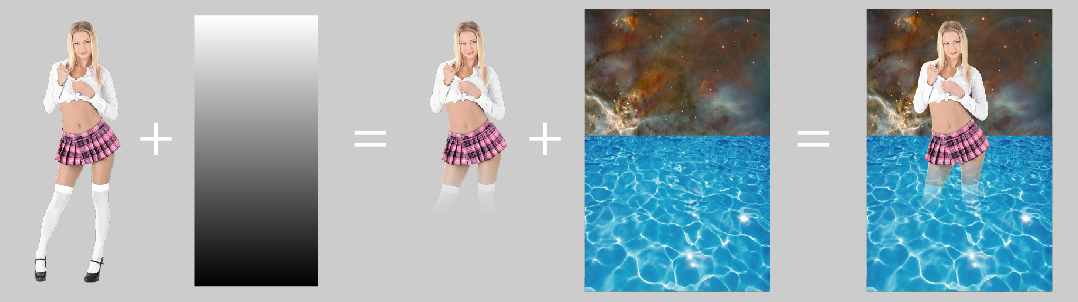
Anyone know how to do this? I've been trying to solve it for days
This is the code of my scene:
clip {
id: MyClip
deny: cage
border: 50
}
texture {
id: logo
source: sellofondo.png
camera {
type: 2D
size: 800, 450
// LOGO SELLO DE AGUA
sprite {
pos: 420, 600, 1
hotspot: 0.5, 1.0
source: sellofondo.png
blend: false
}
quad { // Non textured quad polygon.
size: 800, 450
pos: 0, 0
hotspot: 0, 0
shader: fragment, redwater.fsh // fragment or vertex and source file of the GLSL shader.
}
clipSprite {
pos: 405, 455, 1
standingHeight: 400
sittingHeight: 300
source: MyClip
color: 0, 0, 0
opacity: 0.3
shader: fragment, Blur.fsh
uniform: orientation, vec2, 0, 1
uniform: changeColor, int, 1
}
//ZOOM (SOMBRA)
clipSprite {
pos: 440, 600, 1
scale: -2.0, 2.0
standingHeight: 380
sittingHeight: 280
source: MyClip
color: 0, 0, 0
opacity: 0.7
shader: fragment, Blur.fsh
uniform: orientation, vec2, 0, 1
uniform: changeColor, int, 1
}
//ZOOM (ORIGINAL)
clipSprite {
pos: 420, 600, 1
scale: -2.0, 2.0
standingHeight: 380
sittingHeight: 280
source: MyClip
}
//ORIGINAL (SOMBRA)
clipSprite {
pos: 420, 430, 1
standingHeight: 380
sittingHeight: 280
source: MyClip
color: 0, 0, 0
opacity: 0.8
shader: fragment, Blur.fsh
uniform: orientation, vec2, 0, 1
uniform: changeColor, int, 1
}
//ORIGINAL
clipSprite {
pos: 400, 430, 1
standingHeight: 380
sittingHeight: 280
source: MyClip
}
/// ORIGINAL REFLEJ0
clipSprite {
scale: 1, -1
hotspot: 0,0
pos: 400, 430, 1
standingHeight: 380
sittingHeight: 280
opacity: 0.5
source: MyClip
clipNameSprite {
scale: 0.5
pos: 400, 450, 1
hotspot: 0.5, 1
source: MyClip
}
}
November 4, 2018


Based on prior conversations with the team, the full Logo needs to be Used for any Public Display...
This has been a source of topics for a long time.
REX, the Owner does not Object to images used as Long as the Logo is On the Image.
You "S" is not the Official Logo..
In March 2017 - Because of use in clubs and bars and NO Logo being displayed, . a New release which ***** the Logo was released.
Version .160It was met with Member comments...
Rex commented here..By Version .164 it was set to be a Dim overlay and only every few shows.
So, as not to re-debate the issue over the Logo requirements.
For your Public use, I think it is best to use the full Logo.
Back in 2016 we asked about Public Display of Static Pictures..
Again, The Owner REX, said.. As Long as the Logo is Display he did not Object to it.
So for Video, I think it is a MUST, that the Full iStripper Logo be Displayed for Every Video.
This is just my Advice. It's not an Official response...
This has been a source of topics for a long time.
REX, the Owner does not Object to images used as Long as the Logo is On the Image.
You "S" is not the Official Logo..
In March 2017 - Because of use in clubs and bars and NO Logo being displayed, . a New release which ***** the Logo was released.
Version .160
https://www.istripper.com/forum/thread/35947/1?post=528848
You are not allowed to see this topic or access data relative to this topic
Rex commented here..
https://www.istripper.com/forum/thread/35947/1?post=528973
You are not allowed to see this topic or access data relative to this topic
So, as not to re-debate the issue over the Logo requirements.
For your Public use, I think it is best to use the full Logo.
Back in 2016 we asked about Public Display of Static Pictures..
Again, The Owner REX, said.. As Long as the Logo is Display he did not Object to it.
So for Video, I think it is a MUST, that the Full iStripper Logo be Displayed for Every Video.
This is just my Advice. It's not an Official response...
TheEmu
Joined in Jul 2012 3309 post(s)
November 4, 2018
@7171al71
Firstly, there are a couple of errors in the .scn code you posted
texture {
id: logo
source: sellofondo.png
} // <=== This closing brace was missing ======
camera {
type: 2D
size: 800, 450
// LOGO SELLO DE AGUA
sprite {
pos: 420, 600, 1
hotspot: 0.5, 1.0
source: logo // <=== You can not directly reference the png here
blend: false
}
Secondly, I think you might want to change the order in which you declare the various scene elements. I say this because in your pictures you indicate that the static backgrounds are partialy transparent and it is pointless having such an image as the rearmost layer because there is nothing to see behind it. In any case the layer currently in front of it will totaly hide it even the shader is producing a partially transparent result, you would need to add a blend: true in order for any transparency to have any effect. (Blend: true means blend this layer with the one behind it based on this layer's alpha channel, blend: false means treat this layer as opaque)
x26638184
Joined in Oct 2018 189 post(s)
November 4, 2018

@Wildanimal, ok but the logo that I'm using I got it from the same website of istripper.com (It's a .svg, which can be opened in illustrator). It is exact and is as a vector.
x26638184
Joined in Oct 2018 189 post(s)
November 5, 2018
@TheEmu .... I Love you !!!!!
Z22
Joined in Aug 2017 1166 post(s)
November 5, 2018 (edited)
GCM v1 (girl centred mask)
https://drive.google.com/open?id=1-gtaFbBYHIDr282F9GgymZvzzWXYcTUM
Creates a greyscale form the edge of the screen(distorted atm) to the nearest point on the girl which can be used as a alpha mask.
Restriced to pole clips as it goes a bit odd if there is nothing in the centre, i have tried various methods to get round that limitation with weird results.
Should be able to reduce/eliminate the cabaging(repeting shapes) by adding a few more(another 8 should do it) sample checks in the first part of the loops unless i can figure out how to sample a larger texel area with one check.
x26638184
Joined in Oct 2018 189 post(s)
November 6, 2018
@Z22. What a psychedelic example. It's good and the funds of another world. What do they do?
I wanted to achieve this effect, but it does not work.
The Mask that I place, assumes it as an object. I can leave it transparent or solid, but not as an alpha channel, which is added to the code?
// MASCARA FONDO
sprite {
size: 800, 450
pos: 400, 450, 1
hotspot: 0.5, 1.0 // ESTO TAMPOCO ENTIENDO QUE HACE
source: mascarafondo
opacity: 0.3 // AJUSTAR OPACIDAD ACA
blend: true // True=Transparente - False=Solido
Z22
Joined in Aug 2017 1166 post(s)
November 6, 2018
If you think thats psychadelic you should take a look through my previous posts(here or the release thread)...or my user artwork thread.
Using a colour as an alpha was done in the shader (.fsh) not in the main scene (.scn)
However it may be possible withthe blend command as it accepts GL_* commands
eg:-
blend: SRC_ALPHA,DST_ALPHA (used in bare elegance)
See https://www.khronos.org/registry/OpenGL-Refpages/gl4/html/glBlendFuncSeparate.xhtml
I haven't used that way myself as i do most of my work in shaders.
A shader just to use a colour as an alpha is quite simple. Will make one up and post it for you to have a look at.
You are not allowed to participate yet
As a free user of iStripper, you are not allowed to answer a topic in the forum or to create a new topic.
But you can still access basics categories and get in touch with our community !