0
Discussions for Scenes for Version 1.2.X Fullscreen Mode here Forum / Everything about iStripper
November 17, 2016
for the debugging:
under mac, you can open the console application, filter on 'vghd' and see the shader/opengl errors.
under windows (I didn't test it but it worth a try), maybe with powershell https://msdn.microsoft.com/en-us/powershell, and this on the vghd.log file: http://www.howtogeek.com/tips/how-to-get-tail-like-functionality-on-windows-with-powershell/
EverthangForever
Joined in Oct 2009 2540 post(s)
November 20, 2016
Thankyou @Lezardo. I hope someone will be able to adapt (port) DEBUG from the old VGHD player into a future iStripper version again one day.
I could not find much step-wise GLSL error tracking for Windows apps on the web.
@All, re my previous post about vghd.log error reporting...
I am pretty sure I know now just why I was getting so many properties errors related to nodes in the vghd.log
A lot of it appears to be due to incorrectly placed spaces. ie: Too much white space or not enough space before and after commas in my .scn syntax.
In one case there was an extra '0,' etc. A lot of it like that, obviously comes from copying & pasting too fast & not noticing because the scene still plays ok.
Sorry for that gaffe :-/
TheEmu
Joined in Jul 2012 3309 post(s)
November 30, 2016
@Lezado, @EverthangForever - On windows I have often used a tail like utility called BareTail, most often using it tomonitor vghd.log. I have also noticed that Notepad++ now has a "Monitoring (tail -f)" item in its "View" menu, but have not yet had any reason to try it.
MikeDreams
Joined in Jul 2009 26 post(s)
December 10, 2016 (edited)
So glad I found these super threads here now on iStripper.
Thanks ever so very merry much again to all you screen scene dream machine makers. Keep it up. Always all ways..
May Your Happy Holidays Be Ablaze!
Thanks ever so very merry much again to all you screen scene dream machine makers. Keep it up. Always all ways..
May Your Happy Holidays Be Ablaze!
EverthangForever
Joined in Oct 2009 2540 post(s)
December 11, 2016
For peeps experimenting for a first time with Notepad++
Here is something you can try doing to get used to using it.
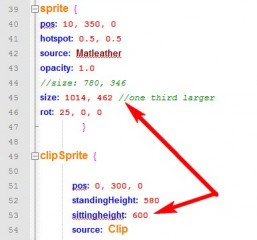
Find the +InvertedShaderExample.scn (if installed ~ it is in your..scenes/ET Scenes folder)
Open it with notepad++
Make the edits shown in pic above
Save the .scn file as same name
Now the scene will play your models in lager size whenever a taskbar clip is playing in fullscreen
EverthangForever
Joined in Oct 2009 2540 post(s)
December 11, 2016
Srry @ohama I'm not familiar with Mac..only PC ..but @Dorsai would know :-/
Continuing...notepad++ examples:
If a user wants to slow down to half, the movement in the fragment shader
Go to scenes/ET Scenes/shaders folder
Find shader file named 'UnknownSB - eHASH22678.2.fsh' (I've written word HASH because this forum software will not allow using a hash symbol)
Open it with notepad++
Edit code line 11 as shown in above pic where it says 'HASHdefine time u_Elapsed'
Save the shader to same name
Exit notepad++
This shader will now run at half speed
EverthangForever
Joined in Oct 2009 2540 post(s)
December 11, 2016
Continuing notepad++ examples
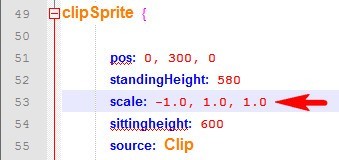
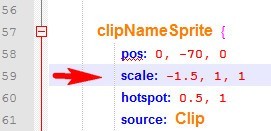
If a user wants to reverse (mirror) the writing on a Tshirt that a model is wearing:
Find the +InvertedShaderExample.scn (if installed ~ it is in your..scenes/ET Scenes folder)
Open it with notepad++
Make the edits shown in pics above
Save the .scn file as same name
Now the model's Tshirt will be oriented correctly ~(mirrored the other way.)😊
If a user wants to reverse (mirror) the writing on a Tshirt that a model is wearing:
Find the +InvertedShaderExample.scn (if installed ~ it is in your..scenes/ET Scenes folder)
Open it with notepad++
Make the edits shown in pics above
Save the .scn file as same name
Now the model's Tshirt will be oriented correctly ~(mirrored the other way.)
DANO70
Joined in Feb 2008 742 post(s)
December 11, 2016 (edited)
@ET/WA
You guys are some of the scene gods enough said.
@WA
The editable speed color changeing ray/rainbow effect in your new christmas scene is so freaking cool..Nice touch sir. I bumped up the clip sizes of it and removed the foreground... Man I love it !! And greatness is never to early. Happy hollidays everyone.
December 12, 2016
@ET/WA
You guys are some of the scene gods enough said.
@WA
The editable speed color changeing ray/rainbow effect in your new christmas scene is so freaking cool..Nice touch sir. I bumped up the clip sizes of it and removed the foreground... Man I love it !! And greatness is never to early. Happy hollidays everyone.
Thanks.
I'm working on a Happy New Year Theme. With some different Tweaks to that shader.
so far I'm not happy with how's it's turning out...
we'll see..
DANO70
Joined in Feb 2008 742 post(s)
December 13, 2016 (edited)
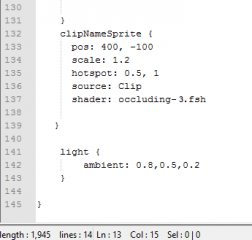
Hey guys I stumbled on to a trick using your x-mas scene WA. I added a clipname sprite to it with no name glow perimeter and added the same occluding.fsh to the sprite and it works just like the clip sprite and changes colors. What I like about it most is it makes the name glow like it used to and stays on screen and changes with each card. As you know I'm sure, you can make it one color or flicker just by tweeking the shader you guys wrote in it. It makes for a nice flashing neon sign.
EverthangForever
Joined in Oct 2009 2540 post(s)
December 14, 2016
Nice effect @DANO70 thanks lots :-)
lines 132 -143 only ~ is the code magic to apply folks,
lines 132 -143 only ~ is the code magic to apply folks,
DANO70
Joined in Feb 2008 742 post(s)
December 14, 2016 (edited)
Sorry I should have edited the pic and code better. That is where the foreground gift sprite was orginaly :) That's why you guys are the "pros".....
December 14, 2016 (edited)
@DANO70
Add this Just before the end of the FBO Framebuffer
It will add the Ray Effect to the NameSprite.
your ClipNameSprite at the end of the Scene
Add this Just before the end of the FBO Framebuffer
It will add the Ray Effect to the NameSprite.
[b]
clipNameSprite {
// Note: Dimensions and Scales are divided by 4 Here
// Because the Frame Buffer is 1/4 the Size of the
// Backlight Sprite 2200, 1080 divided by 4 = 550, 270
//
// these are taken from the ClipNameSprite at the end of the Scene
// pos: 400, -100 Divide these by 4
// scale: 1.2 Divide this by 4
pos: 100, -25
scale: 0.30
hotspot: 0.5, 1
source: Clip
shader: occluding-3.fsh
}
[/b]
your ClipNameSprite at the end of the Scene
[b]
clipNameSprite {
// these ar 4 times what the positions and scaling above are
pos: 400, -100
scale: 1.2
hotspot: 0.5, 1
source: Clip
shader: occluding-3.fsh
}
[/b]
DANO70
Joined in Feb 2008 742 post(s)
December 14, 2016 (edited)
Thanks as usual...Make something cool even better :) I also should add that I used a duplicate shader sped up just for the name color changeing.
December 14, 2016 (edited)
@DANO70
I did something Similar.
I made a Duplicate Shader and Called it Occluding-3b.fsb
I used it for the rays on the ClipNameSprite
and Switch the
So the Rays are a Different Color from the Text..
If you Make a 3rd Copy.|
then you can have a different Speed, and a Different Color
I did something Similar.
I made a Duplicate Shader and Called it Occluding-3b.fsb
I used it for the rays on the ClipNameSprite
and Switch the
sinand
cosof the three Colors..
So the Rays are a Different Color from the Text..
If you Make a 3rd Copy.|
then you can have a different Speed, and a Different Color
Original Version
// UNCOMMENT FOR FASTER RAINBOW
float rC = weight +( sin(u_Elapsed*0.3)/1.0);
float gC = weight +( cos(u_Elapsed*0.6)/1.0);
float bC = weight +( sin(u_Elapsed*0.2)/1.0);
3b version
// UNCOMMENT FOR FASTER RAINBOW
float rC = weight +( cos(u_Elapsed*0.3)/1.0);
float gC = weight +( sin(u_Elapsed*0.6)/1.0);
float bC = weight +( cos(u_Elapsed*0.2)/1.0);
DANO70
Joined in Feb 2008 742 post(s)
December 14, 2016
Nice... Keep that know how flowing :) Good night it's bedtime for me.
TheEmu
Joined in Jul 2012 3309 post(s)
December 14, 2016
As some of you have probably noticed if you use a shader with a sprite then the scale, opacity, and color attributes in specified in the .scn for the sprite often have no effect. I recently found out why - it because the shaders are not bothering to do the trivial amount of work necessary to take them into account.
Often a shader will use gl_FragCoord,xy as the pixel's coordinates. If you replace this with gl_FragCoord,xy*gl_FragCoord.w then the scale factor is used. In most cases gl_FragCoord will ony be used in a couple of places and it is trivial to change them. Some (poorly written) shaders may scatter references to gl_FragCoord throughout a shader and those could be a bit of a ***** to correct, but most are OK.
A fragment shader produces its main result by updating a variable called gl_FragColor with the RGB color components and opacity that the shader has calculated. If after doing that gl_FragColor is multiplied by gl_Color, e.g. by using gl_FragColor *= gl_Color; or by using some other means of achieving a similar end then the sprite's color attribute will be taken into account.
Using these in shaders that you use can avoid having to work round them in the .scn files.
EverthangForever
Joined in Oct 2009 2540 post(s)
December 14, 2016 (edited)
@Emu whats the chance for you to do an update zip just for the shaders from your sandbox & shadertoy conversions at least ?
I know we can all individually go through notepad++ view > replace to re-edit them all from gl_FragCoord,xy to gl_FragCoord,xy*gl_FragCoord.w
however, I'm a tad concerned that any typos made by peeps in shaders will cause mass future failures to compile :-/
I know we can all individually go through notepad++ view > replace to re-edit them all from gl_FragCoord,xy to gl_FragCoord,xy*gl_FragCoord.w
however, I'm a tad concerned that any typos made by peeps in shaders will cause mass future failures to compile :-/
TheEmu
Joined in Jul 2012 3309 post(s)
December 14, 2016
@EverthangForever
I was already intending to do it, but it may have to wait until christmas.
I was already intending to do it, but it may have to wait until christmas.
EverthangForever
Joined in Oct 2009 2540 post(s)
December 14, 2016
@TheEmu thanks..that will be great.
Continuing notepad++ examples
If a user wants to make a shader work the right way up with sampler pics rendered by a shader:
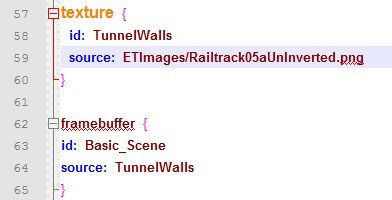
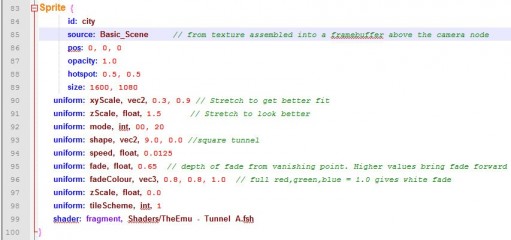
~Find the pic file Railtrack05a.png (if installed by ELECTRICAveNewUniMod12POVupdate.zip.. it is in your..scenes/ET Scenes/ETImages folder)
~Making sure transparency is preserved, use irfanview (or another graphics prog) to invert it to the normal orientation.(correct way up)
~Save it to same location & name it Railtrack05aUnInverted.png
~Find the +POV - PanoramaMod001.scn ( should be in your scenes/ET Scenes folder )
~Open it with notepad++
~Make the edits shown in pics above
~Save the .scn file as +POV - PanoramaMod002UnInverted.scn
Now the scene will run with background texture saved in the normal way up
----
side note: i will be updating many earlier shader based .scn files in future so that
sampler textures (images) are rendered according to the orientation in which they are
already stored in folders. @TheEmu thanks for explaining why most shaders stop things like
scale 1, -1, 1 and other parameters from working properly in iStripper.😊
Continuing notepad++ examples
If a user wants to make a shader work the right way up with sampler pics rendered by a shader:
~Find the pic file Railtrack05a.png (if installed by ELECTRICAveNewUniMod12POVupdate.zip.. it is in your..scenes/ET Scenes/ETImages folder)
~Making sure transparency is preserved, use irfanview (or another graphics prog) to invert it to the normal orientation.(correct way up)
~Save it to same location & name it Railtrack05aUnInverted.png
~Find the +POV - PanoramaMod001.scn ( should be in your scenes/ET Scenes folder )
~Open it with notepad++
~Make the edits shown in pics above
~Save the .scn file as +POV - PanoramaMod002UnInverted.scn
Now the scene will run with background texture saved in the normal way up
----
side note: i will be updating many earlier shader based .scn files in future so that
sampler textures (images) are rendered according to the orientation in which they are
already stored in folders. @TheEmu thanks for explaining why most shaders stop things like
scale 1, -1, 1 and other parameters from working properly in iStripper.
DANO70
Joined in Feb 2008 742 post(s)
December 14, 2016
@E.T
Is that what I was asking about earlier to ***** the halloween sparkles ? If so GREAT !! I gave up quick trying that. LOL
Is that what I was asking about earlier to ***** the halloween sparkles ? If so GREAT !! I gave up quick trying that. LOL
EverthangForever
Joined in Oct 2009 2540 post(s)
December 14, 2016 (edited)
[email protected] that scale code for nothing it seems .. heheha..
however i was talking about texture2D's in that last bit..and...
@Emu did some work suited to applying to halloween.scn...(as below)
using an arbitrary shader on an arbitrary collection of things assembled in a frame buffer.
// Assemble stuff in a frame buffer.
framebuffer {
id: Buffer1
size: 1600, 900
// I have just used a clipSprite here but, but you can
// can assemble any combination of scene elements.
clipSprite {
pos: 800, 880
standingHeight: 700
source: Clip1
opacity: 1.0
}
}
// ***** the output from the first framebuffer.
framebuffer {
id: Buffer2
source: Buffer1
shader: fragment, Shaders/blur_more.fsh
}
/////////////////////////////////////////////////////////////
camera { // Set up the camera.
type: 2D
pos: 800, 450
size: 1600, 900
// Provide a background
sprite {
pos: 0, 0
source: Image1
hotspot: 0.5, 0.5
size: 1600, 900
}
// Add the output from the second framebuffer. As this is
// now just a normal sprite you can use all the standard
// sprite attributes here such as scale, pos, color etc.
sprite {
pos: 0, 0
hotspot: 0.5, 0.5
source: Buffer2
size: 1600, 900
blend: true
color: 1, 1, 0.5
scale: -1.0, 1.0
}
}
=====================================
Edit: a correction to my previous post. Was an ambiguosly expressed intro..darnit !
should read: ' If a user wants to make a shader work with sampler pics the right way up, when rendered by a shader:'
DANO70
Joined in Feb 2008 742 post(s)
December 14, 2016
@E.T.
Excellent.. I'll get back to that scene tweeking ASAP. Right now I'm too busy toying with W.A's work...HeHe. Thanks guys so much.
Excellent.. I'll get back to that scene tweeking ASAP. Right now I'm too busy toying with W.A's work...HeHe. Thanks guys so much.
TheEmu
Joined in Jul 2012 3309 post(s)
December 15, 2016
It seems I was wrong about multiplying gl_FragCoord,xy by gl_FragCoord.w, it does not have the effect of having the scale attribute from the sprite be effective. I thought that my use of this construct had fixed things for one of my own shader based scenes but it must have been something else that I had done at the same time. The w component of gl_FragCoord is a scale, but I should have realised it could not be the way in which the sprite's scale was communicated to the shaders because it is only one floating point value rather than three. Sorry if I raised anybody's expectations falsely. On the other hand the comments about multiplying gl_FragColor by gl_Color were correct, which is quite useful because it includes the sprite's opacity as well as the RGB components of the color.
EverthangForever
Joined in Oct 2009 2540 post(s)
December 15, 2016 (edited)
@Emu, for me the important thing was to have a means of correcting the automatic flipping of sampler textures in iStripper.
. This we achieved with framebuffering at least.
Its something I would have hoped Totem would address in the design of their platform rather than us having to muddle through such things with code repairs.
Then again they are primarily selling a product ~ the animation ~ and fullscreen is really just an enhancement, so any tinkering you can do to attempt to find new tools is very worthwhile. Can't thank you enough.
A while back you said
This reminded me ( even prior to using framebuffers ) of the behaviour of shaders in a single .scn when you try to use several instances of the same shader below the camera node. This happend when I tried to do a tunnel within a tunnel with the BoyC and at another time, with the Tunnel A shader.
If you render both instances onto their separate sprites using the same open directory texture path calls above the camera node, both instances will select the very same (random?) texture. You have to provide copies of the same shader from separate directories to get them to function independently ~ ie:you have to make a second shader2 location and that way can run each shader instance quite separately or the two instances will not act independently.
. This we achieved with framebuffering at least.
Its something I would have hoped Totem would address in the design of their platform rather than us having to muddle through such things with code repairs.
Then again they are primarily selling a product ~ the animation ~ and fullscreen is really just an enhancement, so any tinkering you can do to attempt to find new tools is very worthwhile. Can't thank you enough.
A while back you said
if you use a shader with a sprite then the scale, opacity, and color attributes in specified in the .scn for the sprite often have no effect. I recently found out why - it because the shaders are not bothering to do the trivial amount of work necessary to take them into account.
This reminded me ( even prior to using framebuffers ) of the behaviour of shaders in a single .scn when you try to use several instances of the same shader below the camera node. This happend when I tried to do a tunnel within a tunnel with the BoyC and at another time, with the Tunnel A shader.
If you render both instances onto their separate sprites using the same open directory texture path calls above the camera node, both instances will select the very same (random?) texture. You have to provide copies of the same shader from separate directories to get them to function independently ~ ie:you have to make a second shader2 location and that way can run each shader instance quite separately or the two instances will not act independently.
DANO70
Joined in Feb 2008 742 post(s)
December 15, 2016
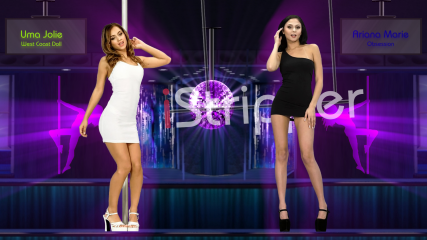
Guys I am in uma and ariana purple heaven right now ! The sign in the background I threw together quick sways left to right. I plan to do more to it eventualy. Again thanks W.A./Emu/E.T. for all you do. I still plan to bring so much of my stuff to you guys when I fell confident of the bugginess/changes this software is going through. Have a great day !!
You are not allowed to participate yet
As a free user of iStripper, you are not allowed to answer a topic in the forum or to create a new topic.
But you can still access basics categories and get in touch with our community !

